0x00 Preface 这个假期打算入门 C++,为后期刷 leetcode 做准备,此笔记主要整理不同于 C 的地方,补充之前没写到的细节,尤其是面向对象部分,面向有 C 基础人群~
0x01 Main
注:C++ 在创建变量时,必须给变量一个初始值,否则会报错
关键字
asm
do
if
return
typedef
auto
double
inline
short
typeid
bool
dynamic_cast
int
signed
typename
break
else
long
sizeof
union
case
enum
mutable
static
unsigned
catch
explicit
namespace
static_cast
using
char
export
new
struct
virtual
class
extern
operator
switch
void
const
false
private
template
volatile
const_cast
float
protected
this
wchar_t
continue
for
public
throw
while
default
friend
register
true
delete
goto
reinterpret_cast
try
字符型变量并不是把字符本身放到内存中存储,而是将对应的ASCII编码放入到存储单元。
转义字符
转义字符
含义
ASCII 码值(十进制)
\a
警报
007
\b
退格(BS) ,将当前位置移到前一列
008
\f
换页(FF),将当前位置移到下页开头
012
\n 换行(LF) ,将当前位置移到下一行开头 010
\r
回车(CR) ,将当前位置移到本行开头
013
\t 水平制表(HT) (跳到下一个TAB位置) 009
\v
垂直制表(VT)
011
*\\*
代表一个反斜线字符 092
'
代表一个单引号字符
039
"
代表一个双引号字符
034
?
代表一个问号
063
\0
数字 0
000
\ddd
8进制转义字符,d 范围 0~7
3位8进制
\xhh
16进制转义字符,h 范围 09,af,A~F
3位16进制
注:需加入 #include <string>
输入:cin >> 变量名cout << 变量名
指针
看 const 右侧紧跟着的是指针还是常量, 是指针就是常量指针,是常量就是指针常量
内存分区模型 C++ 程序在执行时,内存分为:
程序运行前:
代码区:存放函数体的二进制代码,由操作系统进行管理的,特点是共享和只读
全局区:存放全局变量、静态变量、常量
程序运行后:
栈区:由编译器自动分配释放,存放函数的参数值、局部变量、局部常量
注:不要返回局部变量的地址
堆区:由程序员分配和释放,若程序员不释放,程序结束时由操作系统回收
利用 new 在堆区开辟内存,new 创建的数据,会返回该数据类型的指针;利用 delete 释放
1
2
3
4
5
int * a = new int (10 );delete a;int * arr = new int [10 ];delete [] arr;
引用 数据类型 &别名 = 原名
1 2 3 4 5 6 7 8 9 10 11 12 13 14 15 16 17 18 19 20 void mySwap01 (int a, int b) int temp = a; a = b; b = temp; } void mySwap02 (int * a, int * b) int temp = *a; *a = *b; *b = temp; } void mySwap03 (int & a, int & b) int temp = a; a = b; b = temp; }
1 2 3 4 5 6 7 int & test () static int a = 20 ; return a; } test() = 1000 ;
函数提高 1 2 3 4 5 6 7 8 9 10 int func (int a, int b = 10 , int c = 10 ) return a + b + c; } int func2 (int a = 10 , int b = 10 ) int func2 (int a, int b) return a + b; }
1 2 void func (int a, int )
函数重载满足条件:
同一个作用域下
函数名称相同
函数参数类型不同 或 个数不同 或 顺序不同
函数的返回值不可以作为函数重载的条件
类和对象 C++ 面向对象的三大特性:封装、继承、多态
对象上有其属性和行为,具有相同性质的对象,可以抽象称为类
封装
类在设计时,属性和行为写在一起,表现事物class 类名{ 访问权限: 属性 / 行为 };
类在设计时,可以把属性和行为放在不同权限下加以控制
访问权限:
public 公共权限
protected 保护权限
private 私有权限
struct 默认权限为公共
class 默认权限为私有
对象的初始化和清理 编译器提供的构造函数和析构函数是空实现。
构造函数:创建对象时为对象的成员属性赋值,构造函数由编译器自动调用
析构函数:对象销毁前系统自动调用,执行一些清理工作
构造函数语法:类名(){}
析构函数语法:~类名(){}
构造 / 析构函数,没有返回值也不写 void
函数名称与类名相同
构造 / 析构函数可以 / 不可以有参数,因此可以 / 不可以发生重载
程序在 调用对象时 / 对象销毁前 会自动调用构造 / 析构,无须手动调用,而且只会调用一次
按参数分为:有参 / 无参构造(默认构造函数)
调用方式:括号法 Person p1(10);、显示法 Person p2 = Person(10); 、隐式转换法 Person p3 = 10;
注:调用无参构造函数不能加括号,如果加了编译器认为这是一个函数声明Person(10) 单独写就是匿名对象,当前行结束之后,马上析构Person p4(p3); 不能利用 拷贝构造函数 初始化匿名对象,编译器认为是对象声明
1 2 3 4 Person(const Person& p) { age = p.age; }
拷贝构造函数调用时机通常有三种情况:
使用一个已经创建完毕的对象来初始化一个新对象
1 2 3 4 5 void test01 () Person man (100 ) ; Person newman (man) ; Person newman2 = man; }
值传递的方式给函数参数传值
1 2 3 4 5 6 void doWork (Person p1) void test02 () Person p; doWork(p); }
以值方式返回局部对象
1 2 3 4 5 6 7 8 9 10 Person doWork2 () { Person p1; cout << (int *)&p1 << endl ; return p1; } void test03 () Person p = doWork2(); cout << (int *)&p << endl ; }
默认情况下,C++ 编译器至少给一个类添加 3 个函数
默认构造函数(无参,函数体为空)
默认析构函数(无参,函数体为空)
默认拷贝构造函数,对属性进行值拷贝
构造函数调用规则如下:
如果用户定义有参构造函数,C++ 不再提供默认无参构造,但是会提供默认拷贝构造
如果用户定义拷贝构造函数,C++ 不再提供其他构造函数
深浅拷贝是面试经典问题,也是常见的一个坑
浅拷贝:简单的赋值拷贝操作
深拷贝:在堆区重新申请空间,进行拷贝操作
1 2 3 Person(const Person& p) { m_height = new int (*p.m_height); }
如果不利用深拷贝在堆区创建新内存,会导致浅拷贝带来的重复释放堆区问题
C++ 提供了初始化列表语法,用来初始化属性
构造函数():属性1(值1),属性2(值2)... {}
1 2 3 4 5 6 7 8 9 Person(int a, int b, int c) { m_A = a; m_B = b; m_C = c; } Person(int a, int b, int c) :m_A(a), m_B(b), m_C(c) {}
类对象作为类成员
静态成员变量
静态成员变量两种访问方式1 2 3 4 5 6 7 Person p1; p1.m_A = 100 ; cout << "p1.m_A = " << p1.m_A << endl ; cout << "m_A = " << Person::m_A << endl ;
静态成员函数
静态成员变量两种访问方式1 2 3 4 5 6 Person p1; p1.func(); Person::func();
类内的成员变量和成员函数分开存储,只有非静态成员变量才属于类的对象上,静态成员变量/函数不占对象空间,函数也不占对象空间,所有函数共享一个函数实例
this 指针指向被调用的成员函数所属的对象,是隐含每一个非静态成员函数内的一种指针,不需要定义,直接使用即可
用途:
当形参和成员变量同名时,可用 this 指针来区分
1 2 3 Person(int age) { this ->age = age; }
在类的非静态成员函数中返回对象本身,可使用 return *this
空指针,可以调用成员函数,但如果成员函数中用到了 this 指针,就不可以了
1 2 3 4 void test () Person * p = NULL ; p->ShowClassName(); }
const 修饰成员函数 常函数:
成员函数后加 const 后我们称为这个函数为常函数
常函数内不可以修改成员属性
成员属性声明时加关键字 mutable 后,在常函数中依然可以修改
1 2 3 4 5 6 7 8 9 10 11 void ShowPerson () const this ->m_B = 100 ; } mutable int m_B;
常对象:
声明对象前加 const 称该对象为常对象
常对象只能调用常函数
1 2 3 4 const Person person;cout << person.m_A << endl ;person.m_B = 100 ;
友元 让一个函数或类访问另一个类中私有成员,关键字 friend
友元的三种实现:
1 2 3 4 5 6 7 8 9 10 11 12 13 14 15 16 17 Person operator +(const Person& p1, const Person& p2) { Person temp (0 , 0 ) ; temp.m_A = p1.m_A + p2.m_A; temp.m_B = p1.m_B + p2.m_B; return temp; } Person operator +(const Person& p2, int val) { Person temp; temp.m_A = p2.m_A + val; temp.m_B = p2.m_B + val; return temp; } Person p3 = p2 + 10 ;
总结:对于内置的数据类型的表达式的的运算符是不可能改变的,不要滥用运算符重载
左移运算符重载
1 2 3 4 5 6 ostream& operator <<(ostream& out, Person& p) { out << "a:" << p.m_A << " b:" << p.m_B; return out; }
递增运算符重载
1 2 3 4 5 6 7 8 9 10 11 12 13 14 15 16 17 18 19 MyInteger() { m_Num = 0 ; } MyInteger& operator ++() { m_Num++; return *this ; } MyInteger operator ++(int ) { MyInteger temp = *this ; m_Num++; return temp; }
赋值运算符重载
默认构造函数(无参,函数体为空)
默认析构函数(无参,函数体为空)
默认拷贝构造函数,对属性进行值拷贝
赋值运算符 operator=,对属性进行值拷贝
如果类中有属性指向堆区,做赋值操作时也会出现深浅拷贝问题
1 2 3 4 5 6 7 8 9 10 11 12 13 14 15 Person& operator =(Person &p) { if (m_Age != NULL ) { delete m_Age; m_Age = NULL ; } m_Age = new int (*p.m_Age); return *this ; }
关系运算符重载
1 2 3 4 5 6 7 8 9 10 11 12 13 14 15 16 17 bool operator ==(Person & p) { if (this ->m_Name == p.m_Name && this ->m_Age == p.m_Age) { return true ; } else { return false ; } } bool operator !=(Person & p) { if (this ->m_Name == p.m_Name && this ->m_Age == p.m_Age) { return false ; } else { return true ; } }
函数调用 () 运算符重载
由于重载后使用的方式非常像函数的调用,因此称为仿函数
仿函数没有固定写法,非常灵活
1 2 3 4 5 6 7 8 9 10 11 12 13 14 15 class MyAdd {public : int operator () (int v1, int v2) return v1 + v2; } }; void test02 () MyAdd add; int ret = add(10 , 10 ); cout << "ret = " << ret << endl ; cout << "MyAdd()(100,100) = " << MyAdd()(100 , 100 ) << endl ; }
继承 class 子类 : 继承方式 父类 可以减少重复的代码
class A : public B;
A 类称为子类 / 派生类
B 类称为父类 / 基类
1 2 3 4 5 6 7 8 9 10 11 12 13 14 15 16 17 18 19 20 21 22 23 class Base {public : int m_A; protected : int m_B; private : int m_C; }; class Son :public Base {public : int m_D; }; void test01 () cout << "sizeof Son = " << sizeof (Son) << endl ; } int main () test01(); return 0 ; }
同名静态成员处理方式和非静态处理方式一样,只不过有两种访问的方式(通过对象 和 通过类名)
多继承语法
语法:class 子类:继承方式 父类1 ,继承方式 父类2...
多继承可能会引发父类中有同名成员出现,需要加作用域区分
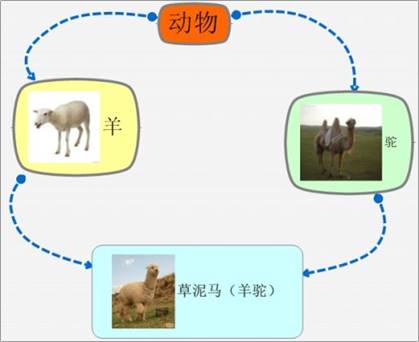
菱形 (钻石) 继承 两个派生类继承同一个基类,又有某个类同时继承者两个派生类
菱形继承问题:
羊继承了动物的数据,驼同样继承了动物的数据,当草泥马使用数据时,就会产生二义性。
草泥马继承自动物的数据继承了两份,而这份数据我们只需要一份。
1 2 3 4 5 6 7 8 9 10 class Animal {public : int m_Age; }; class Sheep :virtual public Animal {};class Tuo :virtual public Animal {};class SheepTuo :public Sheep, public Tuo {};
多态
静态多态:函数重载、运算符重载,复用函数名
动态多态:派生类和虚函数实现运行时多态
区别:
静态多态的函数地址早绑定 - 编译阶段确定函数地址
动态多态的函数地址晚绑定 - 运行阶段确定函数地址
1 2 3 4 5 6 7 8 9 class Animal {public : virtual void speak () };
多态满足条件:
有继承关系
子类重写父类中的虚函数
多态使用:父类指针或引用指向子类对象
多态的优点:代码组织结构清晰,可读性强,利于前期和后期的扩展以及维护
纯虚函数和抽象类 在多态中,通常父类中虚函数的实现是毫无意义的,主要都是调用子类重写的内容,因此将虚函数改为纯虚函数
纯虚函数语法:virtual 返回值类型 函数名 (参数列表) = 0;
当类中有了纯虚函数,这个类也称为抽象类
抽象类特点:
无法实例化对象
子类必须重写抽象类中的纯虚函数,否则也属于抽象类
1 2 3 4 5 6 7 8 9 10 11 12 13 14 15 16 17 18 class Base {public : virtual void func () 0 ; }; class Son :public Base {public : virtual void func () cout << "func调用" << endl ; }; }; void test01 () Base * base = NULL ; base = new Son; base->func(); delete base; }
虚析构和纯虚析构 多态使用时,如果子类中有属性开辟到堆区,那么父类指针在释放时无法调用到子类的析构代码,会导致子类对象可能清理不干净,造成内存泄漏
解决方式:将父类中的析构函数改为虚析构或者纯虚析构
共性:
可以解决父类指针释放子类对象
都需要有具体的函数实现
区别:
虚析构语法:
virtual ~类名(){}
纯虚析构语法:
virtual ~类名() = 0;类名::~类名(){}
总结:
1. 虚析构或纯虚析构就是用来解决通过父类指针释放子类对象
2. 如果子类中没有堆区数据,可以不写为虚析构或纯虚析构
3. 拥有纯虚析构函数的类也属于抽象类
文件操作 头文件 <fstream>
操作文件的三大类:
ofstream:写操作
ifstream:读操作
fstream :读写操作
文件类型分为:文本文件(ASCII码)、二进制文件
打开方式
解释
ios::in
为读文件而打开文件
ios::out
为写文件而打开文件
ios::ate
初始位置:文件尾
ios::app
追加方式写文件
ios::trunc
如果文件存在先删除,再创建
ios::binary
二进制方式
注:文件打开方式可以配合使用,利用 | 操作符
写文件
创建流对象ofstream ofs;
打开文件ofs.open("文件路径",打开方式);
写数据ofs << "写入的数据";
关闭文件ofs.close();
读文件 读文件与写文件步骤相似,但读取方式比较多
创建流对象ifstream ifs;
打开文件并判断文件是否打开成功ifs.open("文件路径",打开方式);
读数据(四种方式)
关闭文件ifs.close();
1 2 3 4 5 6 7 8 9 10 11 12 13 14 15 16 17 18 19 20 21 22 23 24 25 26 27 28 29 30 if (!ifs.is_open()) { cout << "文件打开失败" << endl ; return ; } char buf[1024 ] = { 0 };while (ifs >> buf) { cout << buf << endl ; } char buf[1024 ] = { 0 };while (ifs.getline(buf, sizeof (buf))) { cout << buf << endl ; } string buf;while (getline(ifs, buf)) { cout << buf << endl ; } char c; while ((c = ifs.get()) != EOF) { cout << c; } ifs.close();
二进制文件 打开方式要指定为 ios::binary
写文件 主要利用流对象调用成员函数 write
函数原型:ostream& write(const char * buffer, int len);
参数解释:字符指针 buffer 指向内存中一段存储空间,len 是读写的字节数
读文件 主要利用流对象调用成员函数 read
函数原型:istream& read(char *buffer, int len);
C++ advanced 模板 模板不可以直接使用,它只是一个框架;编程思想:泛型编程;提供两种机制:函数模板和类模板
作用:
语法:
1 2 template <typename T> t 函数声明/定义(类)
函数模板 示例:
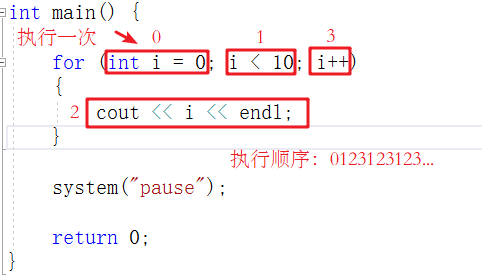
1 2 3 4 5 6 7 8 9 10 11 12 13 14 15 16 17 18 19 20 21 22 23 24 25 26 27 28 29 30 31 32 33 34 35 36 37 38 39 40 41 42 43 void swapInt (int & a, int & b) int temp = a; a = b; b = temp; } template <typename T>void mySwap (T& a, T& b) T temp = a; a = b; b = temp; } void test01 () int a = 10 ; int b = 20 ; mySwap(a, b); mySwap<int >(a, b); cout << "a = " << a << endl ; cout << "b = " << b << endl ; } int main () test01(); system("pause" ); return 0 ; }
总结:
使用函数模板有两种方式:自动类型推导、显示指定类型
注意事项:
自动类型推导,必须推导出一致的数据类型 T,才可以使用
模板必须要确定出 T 的数据类型,才可以使用
示例:
1 2 3 4 5 6 7 8 9 10 11 12 13 14 15 16 17 18 19 20 21 22 23 24 25 26 27 28 29 30 31 32 33 34 35 36 37 38 39 40 41 42 43 44 template <class T >void mySwap (T& a, T& b) T temp = a; a = b; b = temp; } void test01 () int a = 10 ; int b = 20 ; char c = 'c' ; mySwap(a, b); } template <class T >void func () cout << "func 调用" << endl ; } void test02 () func<int >(); } int main () test01(); test02(); system("pause" ); return 0 ; }
普通函数与函数模板区别:
普通函数调用时可以发生自动类型转换(隐式类型转换)
1 2 3 4 5 6 7 8 9 10 11 12 13 14 15 16 17 18 19 20 21 22 23 24 25 26 27 28 29 30 31 32 33 34 35 int myAdd01 (int a, int b) return a + b; } template <class T >T myAdd02 (T a, T b) return a + b; } void test01 () int a = 10 ; int b = 20 ; char c = 'c' ; cout << myAdd01(a, c) << endl ; myAdd02<int >(a, c); } int main () test01(); system("pause" ); return 0 ; }
总结:建议使用显示指定类型的方式,调用函数模板,因为可以自己确定通用类型T
普通函数与函数模板的调用规则
如果函数模板和普通函数都可以实现,优先调用普通函数
1 2 3 4 5 6 7 8 9 10 11 12 13 14 15 16 17 18 19 20 21 22 23 24 25 26 27 28 29 30 31 32 33 34 35 36 37 38 39 40 41 42 43 44 45 46 47 void myPrint (int a, int b) cout << "调用的普通函数" << endl ; } template <typename T>void myPrint (T a, T b) cout << "调用的模板" << endl ; } template <typename T>void myPrint (T a, T b, T c) cout << "调用重载的模板" << endl ; } void test01 () int a = 10 ; int b = 20 ; myPrint(a, b); myPrint<>(a, b); int c = 30 ; myPrint(a, b, c); char c1 = 'a' ; char c2 = 'b' ; myPrint(c1, c2); } int main () test01(); system("pause" ); return 0 ; }
总结:既然提供了函数模板,最好就不要提供普通函数,否则容易出现二义性
模板的局限性
1 2 3 4 5 template <class T >void f (T a, T b) a = b; }
在上述代码中提供的赋值操作,如果传入的a和b是一个数组,就无法实现了
1 2 3 4 5 template <class T >void f (T a, T b) if (a > b) { ... } }
在上述代码中,如果T的数据类型传入的是像Person这样的自定义数据类型,也无法正常运行
因此C++为了解决这种问题,提供模板的重载,可以为这些特定的类型提供具体化的模板
1 2 3 4 5 6 7 8 9 10 11 12 13 14 15 16 17 18 19 20 21 22 23 24 25 26 27 28 29 30 31 32 33 34 35 36 37 38 39 40 41 42 43 44 45 46 47 48 49 50 51 52 53 54 55 56 57 58 59 60 61 62 63 64 65 66 67 68 69 70 71 72 73 74 75 76 77 78 79 80 81 82 83 84 85 86 87 88 89 #include <iostream> using namespace std ;#include <string> class Person { public : Person(string name, int age) { this ->m_Name = name; this ->m_Age = age; } string m_Name; int m_Age; }; template <class T >bool myCompare (T& a, T& b) if (a == b) { return true ; } else { return false ; } } template <> bool myCompare (Person &p1, Person &p2) if ( p1.m_Name == p2.m_Name && p1.m_Age == p2.m_Age) { return true ; } else { return false ; } } void test01 () int a = 10 ; int b = 20 ; bool ret = myCompare(a, b); if (ret) { cout << "a == b " << endl ; } else { cout << "a != b " << endl ; } } void test02 () Person p1 ("Tom" , 10 ) ; Person p2 ("Tom" , 10 ) ; bool ret = myCompare(p1, p2); if (ret) { cout << "p1 == p2 " << endl ; } else { cout << "p1 != p2 " << endl ; } } int main () test01(); test02(); system("pause" ); return 0 ; }
利用具体化的模板,可以解决自定义类型的通用化
函数模板案例
利用函数模板封装一个排序的函数,可以对不同数据类型数组进行排序
1 2 3 4 5 6 7 8 9 10 11 12 13 14 15 16 17 18 19 20 21 22 23 24 25 26 27 28 29 30 31 32 33 34 35 36 37 38 39 40 41 42 43 44 45 46 47 48 49 50 51 52 53 54 55 56 57 58 59 60 61 62 63 64 65 template <typename T>void mySwap (T &a, T&b) T temp = a; a = b; b = temp; } template <class T >void mySort (T arr[], int len) for (int i = 0 ; i < len; i++) { int max = i; for (int j = i + 1 ; j < len; j++) { if (arr[max] < arr[j]) { max = j; } } if (max != i) { mySwap(arr[max], arr[i]); } } } template <typename T>void printArray (T arr[], int len) for (int i = 0 ; i < len; i++) { cout << arr[i] << " " ; } cout << endl ; } void test01 () char charArr[] = "bdcfeagh" ; int num = sizeof (charArr) / sizeof (char ); mySort(charArr, num); printArray(charArr, num); } void test02 () int intArr[] = { 7 , 5 , 8 , 1 , 3 , 9 , 2 , 4 , 6 }; int num = sizeof (intArr) / sizeof (int ); mySort(intArr, num); printArray(intArr, num); } int main () test01(); test02(); system("pause" ); return 0 ; }
类模板 1 2 3 4 5 6 7 8 9 10 11 12 13 14 15 16 17 18 19 20 21 22 23 24 25 26 27 28 29 30 31 32 33 34 35 #include <string> template <class NameType , class AgeType >class Person { public : Person(NameType name, AgeType age) { this ->mName = name; this ->mAge = age; } void showPerson () { cout << "name: " << this ->mName << " age: " << this ->mAge << endl ; } public : NameType mName; AgeType mAge; }; void test01 () Person<string , int >P1("孙悟空" , 999 ); P1.showPerson(); } int main () test01(); system("pause" ); return 0 ; }
类模板与函数模板区别主要有两点:
类模板没有自动类型推导的使用方式
1 2 3 4 5 6 7 8 9 10 11 12 13 14 15 16 17 18 19 20 21 22 23 24 25 26 27 28 29 30 31 32 33 34 35 36 37 38 39 40 41 42 43 44 45 #include <string> template <class NameType , class AgeType =int >class Person { public : Person(NameType name, AgeType age) { this ->mName = name; this ->mAge = age; } void showPerson () { cout << "name: " << this ->mName << " age: " << this ->mAge << endl ; } public : NameType mName; AgeType mAge; }; void test01 () Person <string ,int >p("孙悟空" , 1000 ); p.showPerson(); } void test02 () Person <string > p("猪八戒" , 999 ); p.showPerson(); } int main () test01(); test02(); system("pause" ); return 0 ; }
类模板中成员函数和普通类中成员函数创建时机是有区别的:
普通类中的成员函数一开始就可以创建
1 2 3 4 5 6 7 8 9 10 11 12 13 14 15 16 17 18 19 20 21 22 23 24 25 26 27 28 29 30 31 32 33 34 35 36 37 38 39 40 41 42 43 44 45 46 47 48 class Person1 { public : void showPerson1 () { cout << "Person1 show" << endl ; } }; class Person2 { public : void showPerson2 () { cout << "Person2 show" << endl ; } }; template <class T >class MyClass { public : T obj; void fun1 () void fun2 () }; void test01 () MyClass<Person1> m; m.fun1(); } int main () test01(); system("pause" ); return 0 ; }
类模板对象做函数参数
类模板实例化出的对象,向函数传参的方式
指定传入的类型 — 直接显示对象的数据类型
1 2 3 4 5 6 7 8 9 10 11 12 13 14 15 16 17 18 19 20 21 22 23 24 25 26 27 28 29 30 31 32 33 34 35 36 37 38 39 40 41 42 43 44 45 46 47 48 49 50 51 52 53 54 55 56 57 58 59 60 61 62 63 64 65 66 67 68 69 #include <string> template <class NameType , class AgeType =int >class Person { public : Person(NameType name, AgeType age) { this ->mName = name; this ->mAge = age; } void showPerson () { cout << "name: " << this ->mName << " age: " << this ->mAge << endl ; } public : NameType mName; AgeType mAge; }; void printPerson1 (Person<string , int > &p) p.showPerson(); } void test01 () Person <string , int >p("孙悟空" , 100 ); printPerson1(p); } template <class T1 , class T2 >void printPerson2 (Person<T1, T2>&p) p.showPerson(); cout << "T1的类型为: " << typeid (T1).name() << endl ; cout << "T2的类型为: " << typeid (T2).name() << endl ; } void test02 () Person <string , int >p("猪八戒" , 90 ); printPerson2(p); } template <class T >void printPerson3 (T & p) cout << "T的类型为: " << typeid (T).name() << endl ; p.showPerson(); } void test03 () Person <string , int >p("唐僧" , 30 ); printPerson3(p); } int main () test01(); test02(); test03(); system("pause" ); return 0 ; }
通过类模板创建的对象,可以有三种方式向函数中进行传参
当类模板碰到继承时,需要注意一下几点:
当子类继承的父类是一个类模板时,子类在声明的时候,要指定出父类中T的类型
1 2 3 4 5 6 7 8 9 10 11 12 13 14 15 16 17 18 19 20 21 22 23 24 25 26 27 28 29 30 31 32 33 34 35 36 37 38 39 40 41 42 43 template <class T >class Base { T m; }; class Son :public Base<int > { }; void test01 () Son c; } template <class T1 , class T2 >class Son2 :public Base<T2>{ public : Son2() { cout << typeid (T1).name() << endl ; cout << typeid (T2).name() << endl ; } }; void test02 () Son2<int , char > child1; } int main () test01(); test02(); system("pause" ); return 0 ; }
类模板成员函数类外实现
1 2 3 4 5 6 7 8 9 10 11 12 13 14 15 16 17 18 19 20 21 22 23 24 25 26 27 28 29 30 31 32 33 34 35 36 37 38 39 40 41 42 #include <string> template <class T1 , class T2 >class Person {public : Person(T1 name, T2 age); void showPerson () public : T1 m_Name; T2 m_Age; }; template <class T1 , class T2 >Person<T1, T2>::Person(T1 name, T2 age) { this ->m_Name = name; this ->m_Age = age; } template <class T1 , class T2 >void Person<T1, T2>::showPerson() { cout << "姓名: " << this ->m_Name << " 年龄:" << this ->m_Age << endl ; } void test01 () Person<string, int> p("Tom", 20); p.showPerson(); } int main () test01(); system("pause" ); return 0 ; }
总结:类模板中成员函数类外实现时,需要加上模板参数列表
类模板分文件编写
掌握类模板成员函数分文件编写产生的问题以及解决方式
类模板中成员函数创建时机是在调用阶段,导致分文件编写时链接不到
解决方式1:直接包含.cpp源文件
person.hpp中代码:
1 2 3 4 5 6 7 8 9 10 11 12 13 14 15 16 17 18 19 20 21 22 23 24 25 26 27 #pragma once #include <iostream> using namespace std ;#include <string> template <class T1 , class T2 >class Person {public : Person(T1 name, T2 age); void showPerson () public : T1 m_Name; T2 m_Age; }; template <class T1 , class T2 >Person<T1, T2>::Person(T1 name, T2 age) { this ->m_Name = name; this ->m_Age = age; } template <class T1 , class T2 >void Person<T1, T2>::showPerson() { cout << "姓名: " << this ->m_Name << " 年龄:" << this ->m_Age << endl ; }
类模板分文件编写.cpp中代码
1 2 3 4 5 6 7 8 9 10 11 12 13 14 15 16 17 18 19 20 21 22 #include <iostream> using namespace std ;#include "person.cpp" #include "person.hpp" void test01 () Person<string, int> p("Tom", 10); p.showPerson(); } int main () test01(); system("pause" ); return 0 ; }
总结:主流的解决方式是第二种,将类模板成员函数写到一起,并将后缀名改为.hpp
类模板与友元
掌握类模板配合友元函数的类内和类外实现
全局函数类外实现 - 需要提前让编译器知道全局函数的存在
1 2 3 4 5 6 7 8 9 10 11 12 13 14 15 16 17 18 19 20 21 22 23 24 25 26 27 28 29 30 31 32 33 34 35 36 37 38 39 40 41 42 43 44 45 46 47 48 49 50 51 52 53 54 55 56 57 58 59 60 61 62 63 64 65 66 67 #include <string> template <class T1 , class T2 >class Person ;template <class T1 , class T2 >void printPerson2 (Person<T1, T2> & p) cout << "类外实现 ---- 姓名: " << p.m_Name << " 年龄:" << p.m_Age << endl ; } template <class T1 , class T2 >class Person { friend void printPerson (Person<T1, T2> & p) { cout << "姓名: " << p.m_Name << " 年龄:" << p.m_Age << endl ; } friend void printPerson2<>(Person<T1, T2> & p); public : Person(T1 name, T2 age) { this ->m_Name = name; this ->m_Age = age; } private : T1 m_Name; T2 m_Age; }; void test01 () Person <string , int >p("Tom" , 20 ); printPerson(p); } void test02 () Person <string , int >p("Jerry" , 30 ); printPerson2(p); } int main () test02(); system("pause" ); return 0 ; }
总结:建议全局函数做类内实现,用法简单,而且编译器可以直接识别
类模板案例
可以对内置数据类型以及自定义数据类型的数据进行存储
myArray.hpp中代码
1 2 3 4 5 6 7 8 9 10 11 12 13 14 15 16 17 18 19 20 21 22 23 24 25 26 27 28 29 30 31 32 33 34 35 36 37 38 39 40 41 42 43 44 45 46 47 48 49 50 51 52 53 54 55 56 57 58 59 60 61 62 63 64 65 66 67 68 69 70 71 72 73 74 75 76 77 78 79 80 81 82 83 84 85 86 87 88 89 90 91 92 93 94 95 96 97 98 99 100 101 102 103 104 105 106 #pragma once #include <iostream> using namespace std ;template <class T >class MyArray { public : MyArray(int capacity) { this ->m_Capacity = capacity; this ->m_Size = 0 ; pAddress = new T[this ->m_Capacity]; } MyArray(const MyArray & arr) { this ->m_Capacity = arr.m_Capacity; this ->m_Size = arr.m_Size; this ->pAddress = new T[this ->m_Capacity]; for (int i = 0 ; i < this ->m_Size; i++) { this ->pAddress[i] = arr.pAddress[i]; } } MyArray& operator =(const MyArray& myarray) { if (this ->pAddress != NULL ) { delete [] this ->pAddress; this ->m_Capacity = 0 ; this ->m_Size = 0 ; } this ->m_Capacity = myarray.m_Capacity; this ->m_Size = myarray.m_Size; this ->pAddress = new T[this ->m_Capacity]; for (int i = 0 ; i < this ->m_Size; i++) { this ->pAddress[i] = myarray[i]; } return *this ; } T& operator [](int index) { return this ->pAddress[index]; } void Push_back (const T & val) { if (this ->m_Capacity == this ->m_Size) { return ; } this ->pAddress[this ->m_Size] = val; this ->m_Size++; } void Pop_back () { if (this ->m_Size == 0 ) { return ; } this ->m_Size--; } int getCapacity () { return this ->m_Capacity; } int getSize () { return this ->m_Size; } ~MyArray() { if (this ->pAddress != NULL ) { delete [] this ->pAddress; this ->pAddress = NULL ; this ->m_Capacity = 0 ; this ->m_Size = 0 ; } } private : T * pAddress; int m_Capacity; int m_Size; };
类模板案例—数组类封装.cpp中
1 2 3 4 5 6 7 8 9 10 11 12 13 14 15 16 17 18 19 20 21 22 23 24 25 26 27 28 29 30 31 32 33 34 35 36 37 38 39 40 41 42 43 44 45 46 47 48 49 50 51 52 53 54 55 56 57 58 59 60 61 62 63 64 65 66 67 68 69 70 71 72 73 74 75 76 77 78 79 80 81 82 83 84 85 86 87 88 #include "myArray.hpp" #include <string> void printIntArray (MyArray<int >& arr) for (int i = 0 ; i < arr.getSize(); i++) { cout << arr[i] << " " ; } cout << endl ; } void test01 () MyArray<int > array1 (10 ) ; for (int i = 0 ; i < 10 ; i++) { array1.Push_back(i); } cout << "array1打印输出:" << endl ; printIntArray(array1); cout << "array1的大小:" << array1.getSize() << endl ; cout << "array1的容量:" << array1.getCapacity() << endl ; cout << "--------------------------" << endl ; MyArray<int > array2 (array1) ; array2.Pop_back(); cout << "array2打印输出:" << endl ; printIntArray(array2); cout << "array2的大小:" << array2.getSize() << endl ; cout << "array2的容量:" << array2.getCapacity() << endl ; } class Person {public : Person() {} Person(string name, int age) { this ->m_Name = name; this ->m_Age = age; } public : string m_Name; int m_Age; }; void printPersonArray (MyArray<Person>& personArr) for (int i = 0 ; i < personArr.getSize(); i++) { cout << "姓名:" << personArr[i].m_Name << " 年龄: " << personArr[i].m_Age << endl ; } } void test02 () MyArray<Person> pArray (10 ) ; Person p1 ("孙悟空" , 30 ) ; Person p2 ("韩信" , 20 ) ; Person p3 ("妲己" , 18 ) ; Person p4 ("王昭君" , 15 ) ; Person p5 ("赵云" , 24 ) ; pArray.Push_back(p1); pArray.Push_back(p2); pArray.Push_back(p3); pArray.Push_back(p4); pArray.Push_back(p5); printPersonArray(pArray); cout << "pArray的大小:" << pArray.getSize() << endl ; cout << "pArray的容量:" << pArray.getCapacity() << endl ; } int main () test02(); system("pause" ); return 0 ; }
总结:能够利用所学知识点实现通用的数组
STL(Standard Template Library, 标准模板库) C++的面向对象和泛型编程思想,目的就是复用性的提升
STL基本概念
STL六大组件
容器:各种数据结构,如vector、list、deque、set、map等,用来存放数据。
STL中容器、算法、迭代器容器:
STL容器就是将运用最广泛的一些数据结构实现出来
常用的数据结构:数组, 链表,树, 栈, 队列, 集合, 映射表等
这些容器分为序列式容器和关联式容器两种:
序列式容器:强调值的排序,序列式容器中的每个元素均有固定的位置。
算法:
有限的步骤,解决逻辑或数学上的问题,这一门学科我们叫做算法
算法分为:质变算法和非质变算法
质变算法:是指运算过程中会更改区间内的元素的内容。例如拷贝,替换,删除等
非质变算法:是指运算过程中不会更改区间内的元素内容,例如查找、计数、遍历、寻找极值等
迭代器: 容器和算法之间粘合剂
提供一种方法,使之能够依序寻访某个容器所含的各个元素,而又无需暴露该容器的内部表示方式。
每个容器都有自己专属的迭代器
迭代器使用非常类似于指针,初学阶段我们可以先理解迭代器为指针
迭代器种类:
常用的容器中迭代器种类为双向迭代器,和随机访问迭代器
容器算法迭代器初识
STL中最常用的容器为Vector,可以理解为数组,下面我们将学习如何向这个容器中插入数据、并遍历这个容器
vector存放内置数据类型vector
算法:for_each
迭代器:vector<int>::iterator
1 2 3 4 5 6 7 8 9 10 11 12 13 14 15 16 17 18 19 20 21 22 23 24 25 26 27 28 29 30 31 32 33 34 35 36 37 38 39 40 41 42 43 44 45 46 47 48 49 50 51 52 #include <vector> #include <algorithm> void MyPrint (int val) cout << val << endl ; } void test01 () vector <int > v; v.push_back(10 ); v.push_back(20 ); v.push_back(30 ); v.push_back(40 ); vector <int >::iterator pBegin = v.begin(); vector <int >::iterator pEnd = v.end(); while (pBegin != pEnd) { cout << *pBegin << endl ; pBegin++; } for (vector <int >::iterator it = v.begin(); it != v.end(); it++) { cout << *it << endl ; } cout << endl ; for_each(v.begin(), v.end(), MyPrint); } int main () test01(); system("pause" ); return 0 ; }
Vector存放自定义数据类型
1 2 3 4 5 6 7 8 9 10 11 12 13 14 15 16 17 18 19 20 21 22 23 24 25 26 27 28 29 30 31 32 33 34 35 36 37 38 39 40 41 42 43 44 45 46 47 48 49 50 51 52 53 54 55 56 57 58 59 60 61 62 63 64 65 66 67 68 69 70 71 72 73 74 #include <vector> #include <string> class Person {public : Person(string name, int age) { mName = name; mAge = age; } public : string mName; int mAge; }; void test01 () vector <Person> v; Person p1 ("aaa" , 10 ) ; Person p2 ("bbb" , 20 ) ; Person p3 ("ccc" , 30 ) ; Person p4 ("ddd" , 40 ) ; Person p5 ("eee" , 50 ) ; v.push_back(p1); v.push_back(p2); v.push_back(p3); v.push_back(p4); v.push_back(p5); for (vector <Person>::iterator it = v.begin(); it != v.end(); it++) { cout << "Name:" << (*it).mName << " Age:" << (*it).mAge << endl ; } } void test02 () vector <Person*> v; Person p1 ("aaa" , 10 ) ; Person p2 ("bbb" , 20 ) ; Person p3 ("ccc" , 30 ) ; Person p4 ("ddd" , 40 ) ; Person p5 ("eee" , 50 ) ; v.push_back(&p1); v.push_back(&p2); v.push_back(&p3); v.push_back(&p4); v.push_back(&p5); for (vector <Person*>::iterator it = v.begin(); it != v.end(); it++) { Person * p = (*it); cout << "Name:" << p->mName << " Age:" << (*it)->mAge << endl ; } } int main () test01(); test02(); system("pause" ); return 0 ; }
Vector容器嵌套容器
1 2 3 4 5 6 7 8 9 10 11 12 13 14 15 16 17 18 19 20 21 22 23 24 25 26 27 28 29 30 31 32 33 34 35 36 37 38 39 40 41 42 43 44 #include <vector> void test01 () vector < vector <int > > v; vector <int > v1; vector <int > v2; vector <int > v3; vector <int > v4; for (int i = 0 ; i < 4 ; i++) { v1.push_back(i + 1 ); v2.push_back(i + 2 ); v3.push_back(i + 3 ); v4.push_back(i + 4 ); } v.push_back(v1); v.push_back(v2); v.push_back(v3); v.push_back(v4); for (vector <vector <int >>::iterator it = v.begin(); it != v.end(); it++) { for (vector <int >::iterator vit = (*it).begin(); vit != (*it).end(); vit++) { cout << *vit << " " ; } cout << endl ; } } int main () test01(); system("pause" ); return 0 ; }
STL- 常用容器
string 和 char * 区别:char * 是一个指针char*,管理这个字符串,是一个 char* 型的容器。
特点:
string 类内部封装了很多成员方法
例如:查找find,拷贝copy,删除delete 替换replace,插入insert
string 管理 char* 所分配的内存,不用担心复制越界和取值越界等,由类内部进行负责
string构造函数
1 2 3 string (); string (const string & str); string (int n, char c);
示例:
1 2 3 4 5 6 7 8 9 10 11 12 13 14 15 16 17 18 19 20 21 22 23 24 25 26 27 #include <string> void test01 () string s1; cout << "str1 = " << s1 << endl ; const char * str = "hello world" ; string s2 (str) cout << "str2 = " << s2 << endl ; string s3 (s2) cout << "str3 = " << s3 << endl ; string s4 (10 , 'a' ) cout << "str3 = " << s3 << endl ; } int main () test01(); system("pause" ); return 0 ; }
总结:string的多种构造方式没有可比性,灵活使用即可
string赋值操作
给string字符串进行赋值
1 2 3 4 5 6 7 string & operator =(const char * s); string & operator =(const string &s); string & operator =(char c); string & assign (const char *s) string & assign (const char *s, int n) string & assign (const string &s) string & assign (int n, char c)
1 2 3 4 5 6 7 8 9 10 11 12 13 14 15 16 17 18 19 20 21 22 23 24 25 26 27 28 29 30 31 32 33 34 35 36 37 38 39 40 41 void test01 () string str1; str1 = "hello world" ; cout << "str1 = " << str1 << endl ; string str2; str2 = str1; cout << "str2 = " << str2 << endl ; string str3; str3 = 'a' ; cout << "str3 = " << str3 << endl ; string str4; str4.assign("hello c++" ); cout << "str4 = " << str4 << endl ; string str5; str5.assign("hello c++" ,5 ); cout << "str5 = " << str5 << endl ; string str6; str6.assign(str5); cout << "str6 = " << str6 << endl ; string str7; str7.assign(5 , 'x' ); cout << "str7 = " << str7 << endl ; } int main () test01(); system("pause" ); return 0 ; }
总结:string的赋值方式很多,operator= 这种方式是比较实用的
string字符串拼接
实现在字符串末尾拼接字符串
1 2 3 4 5 6 7 string & operator +=(const char * str); string & operator +=(const char c); string & operator +=(const string & str); string & append (const char *s) string & append (const char *s, int n) string & append (const string &s) string & append (const string &s, int pos, int n)
1 2 3 4 5 6 7 8 9 10 11 12 13 14 15 16 17 18 19 20 21 22 23 24 25 26 27 28 29 30 31 32 33 34 void test01 () string str1 = "我" ; str1 += "爱玩游戏" ; cout << "str1 = " << str1 << endl ; str1 += ':' ; cout << "str1 = " << str1 << endl ; string str2 = "LOL DNF" ; str1 += str2; cout << "str1 = " << str1 << endl ; string str3 = "I" ; str3.append(" love " ); str3.append("game abcde" , 4 ); str3.append(str2, 4 , 3 ); cout << "str3 = " << str3 << endl ; } int main () test01(); system("pause" ); return 0 ; }
总结:字符串拼接的重载版本很多,初学阶段记住几种即可
string查找和替换
查找:查找指定字符串是否存在
1 2 3 4 5 6 7 8 9 10 int find (const string & str, int pos = 0 ) const int find (const char * s, int pos = 0 ) const int find (const char * s, int pos, int n) const int find (const char c, int pos = 0 ) const int rfind (const string & str, int pos = npos) const int rfind (const char * s, int pos = npos) const int rfind (const char * s, int pos, int n) const int rfind (const char c, int pos = 0 ) const string & replace (int pos, int n, const string & str) string & replace (int pos, int n,const char * s)
1 2 3 4 5 6 7 8 9 10 11 12 13 14 15 16 17 18 19 20 21 22 23 24 25 26 27 28 29 30 31 32 33 34 35 36 37 38 39 40 41 42 void test01 () string str1 = "abcdefgde" ; int pos = str1.find("de" ); if (pos == -1 ) { cout << "未找到" << endl ; } else { cout << "pos = " << pos << endl ; } pos = str1.rfind("de" ); cout << "pos = " << pos << endl ; } void test02 () string str1 = "abcdefgde" ; str1.replace(1 , 3 , "1111" ); cout << "str1 = " << str1 << endl ; } int main () system("pause" ); return 0 ; }
总结:
string字符串比较
字符串之间的比较
字符串比较是按字符的ASCII码进行对比
返回 1
< 返回 -1
函数原型:
1 2 int compare (const string &s) const int compare (const char *s) const
1 2 3 4 5 6 7 8 9 10 11 12 13 14 15 16 17 18 19 20 21 22 23 24 25 26 27 28 29 30 31 void test01 () string s1 = "hello" ; string s2 = "aello" ; int ret = s1.compare(s2); if (ret == 0 ) { cout << "s1 等于 s2" << endl ; } else if (ret > 0 ) { cout << "s1 大于 s2" << endl ; } else { cout << "s1 小于 s2" << endl ; } } int main () test01(); system("pause" ); return 0 ; }
总结:字符串对比主要是用于比较两个字符串是否相等,判断谁大谁小的意义并不是很大
string字符存取
1 2 char & operator [](int n); char & at (int n)
1 2 3 4 5 6 7 8 9 10 11 12 13 14 15 16 17 18 19 20 21 22 23 24 25 26 27 28 29 30 31 32 void test01 () string str = "hello world" ; for (int i = 0 ; i < str.size(); i++) { cout << str[i] << " " ; } cout << endl ; for (int i = 0 ; i < str.size(); i++) { cout << str.at(i) << " " ; } cout << endl ; str[0 ] = 'x' ; str.at(1 ) = 'x' ; cout << str << endl ; } int main () test01(); system("pause" ); return 0 ; }
总结:string字符串中单个字符存取有两种方式,利用 [ ] 或 at
string插入和删除
对string字符串进行插入和删除字符操作
1 2 3 4 string & insert (int pos, const char * s) string & insert (int pos, const string & str) string & insert (int pos, int n, char c) string & erase (int pos, int n = npos)
1 2 3 4 5 6 7 8 9 10 11 12 13 14 15 16 17 18 19 void test01 () string str = "hello" ; str.insert(1 , "111" ); cout << str << endl ; str.erase(1 , 3 ); cout << str << endl ; } int main () test01(); system("pause" ); return 0 ; }
总结:插入和删除的起始下标都是从0开始
string子串
从字符串中获取想要的子串
1 string substr (int pos = 0 , int n = npos) const
1 2 3 4 5 6 7 8 9 10 11 12 13 14 15 16 17 18 19 20 21 22 23 void test01 () string str = "abcdefg" ; string subStr = str.substr(1 , 3 ); cout << "subStr = " << subStr << endl ; string email = "hello@sina.com" ; int pos = email.find("@" ); string username = email.substr(0 , pos); cout << "username: " << username << endl ; } int main () test01(); system("pause" ); return 0 ; }
总结:灵活的运用求子串功能,可以在实际开发中获取有效的信息
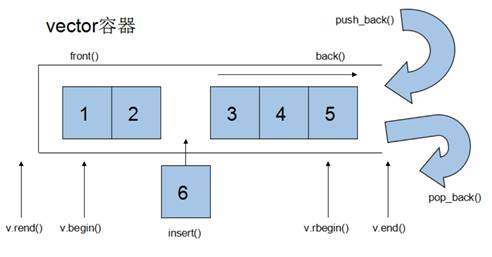
vector容器
vector数据结构和数组非常相似,也称为单端数组
不同之处在于数组是静态空间,而vector可以动态扩展
并不是在原空间之后续接新空间,而是找更大的内存空间,然后将原数据拷贝新空间,释放原空间
vector容器的迭代器是支持随机访问的迭代器
vector构造函数
创建vector容器
1 2 3 4 vector <T> v; vector (v.begin(), v.end()); vector (n, elem); vector (const vector &vec);
1 2 3 4 5 6 7 8 9 10 11 12 13 14 15 16 17 18 19 20 21 22 23 24 25 26 27 28 29 30 31 32 33 34 35 36 37 #include <vector> void printVector (vector <int >& v) for (vector <int >::iterator it = v.begin(); it != v.end(); it++) { cout << *it << " " ; } cout << endl ; } void test01 () vector <int > v1; for (int i = 0 ; i < 10 ; i++) { v1.push_back(i); } printVector(v1); vector <int > v2 (v1.begin(), v1.end()) printVector(v2); vector <int > v3 (10 , 100 ) printVector(v3); vector <int > v4 (v3) printVector(v4); } int main () test01(); system("pause" ); return 0 ; }
总结:vector的多种构造方式没有可比性,灵活使用即可
vector赋值操作
给vector容器进行赋值
1 2 3 4 5 vector & operator =(const vector &vec);assign(beg, end); assign(n, elem);
1 2 3 4 5 6 7 8 9 10 11 12 13 14 15 16 17 18 19 20 21 22 23 24 25 26 27 28 29 30 31 32 33 34 35 36 37 38 39 40 41 #include <vector> void printVector (vector <int >& v) for (vector <int >::iterator it = v.begin(); it != v.end(); it++) { cout << *it << " " ; } cout << endl ; } void test01 () vector <int > v1; for (int i = 0 ; i < 10 ; i++) { v1.push_back(i); } printVector(v1); vector <int >v2; v2 = v1; printVector(v2); vector <int >v3; v3.assign(v1.begin(), v1.end()); printVector(v3); vector <int >v4; v4.assign(10 , 100 ); printVector(v4); } int main () test01(); system("pause" ); return 0 ; }
总结: vector赋值方式比较简单,使用operator=,或者assign都可以
vector容量和大小
对vector容器的容量和大小操作
1 2 3 4 5 6 7 8 9 10 11 12 13 empty(); capacity(); size(); resize(int num); resize(int num, elem);
1 2 3 4 5 6 7 8 9 10 11 12 13 14 15 16 17 18 19 20 21 22 23 24 25 26 27 28 29 30 31 32 33 34 35 36 37 38 39 40 41 42 43 44 45 46 #include <vector> void printVector (vector <int >& v) for (vector <int >::iterator it = v.begin(); it != v.end(); it++) { cout << *it << " " ; } cout << endl ; } void test01 () vector <int > v1; for (int i = 0 ; i < 10 ; i++) { v1.push_back(i); } printVector(v1); if (v1.empty()) { cout << "v1为空" << endl ; } else { cout << "v1不为空" << endl ; cout << "v1的容量 = " << v1.capacity() << endl ; cout << "v1的大小 = " << v1.size() << endl ; } v1.resize(15 ,10 ); printVector(v1); v1.resize(5 ); printVector(v1); } int main () test01(); system("pause" ); return 0 ; }
总结:
vector插入和删除
对vector容器进行插入、删除操作
1 2 3 4 5 6 7 push_back(ele); pop_back(); insert(const_iterator pos, ele); insert(const_iterator pos, int count,ele); erase(const_iterator pos); erase(const_iterator start, const_iterator end); clear();
1 2 3 4 5 6 7 8 9 10 11 12 13 14 15 16 17 18 19 20 21 22 23 24 25 26 27 28 29 30 31 32 33 34 35 36 37 38 39 40 41 42 43 44 45 46 47 48 49 50 #include <vector> void printVector (vector <int >& v) for (vector <int >::iterator it = v.begin(); it != v.end(); it++) { cout << *it << " " ; } cout << endl ; } void test01 () vector <int > v1; v1.push_back(10 ); v1.push_back(20 ); v1.push_back(30 ); v1.push_back(40 ); v1.push_back(50 ); printVector(v1); v1.pop_back(); printVector(v1); v1.insert(v1.begin(), 100 ); printVector(v1); v1.insert(v1.begin(), 2 , 1000 ); printVector(v1); v1.erase(v1.begin()); printVector(v1); v1.erase(v1.begin(), v1.end()); v1.clear(); printVector(v1); } int main () test01(); system("pause" ); return 0 ; }
总结:
vector数据存取
对vector中的数据的存取操作
1 2 3 4 at(int idx); operator []; front(); back();
1 2 3 4 5 6 7 8 9 10 11 12 13 14 15 16 17 18 19 20 21 22 23 24 25 26 27 28 29 30 31 32 33 34 #include <vector> void test01 () vector <int >v1; for (int i = 0 ; i < 10 ; i++) { v1.push_back(i); } for (int i = 0 ; i < v1.size(); i++) { cout << v1[i] << " " ; } cout << endl ; for (int i = 0 ; i < v1.size(); i++) { cout << v1.at(i) << " " ; } cout << endl ; cout << "v1的第一个元素为: " << v1.front() << endl ; cout << "v1的最后一个元素为: " << v1.back() << endl ; } int main () test01(); system("pause" ); return 0 ; }
总结:
vector互换容器
实现两个容器内元素进行互换
1 2 3 4 5 6 7 8 9 10 11 12 13 14 15 16 17 18 19 20 21 22 23 24 25 26 27 28 29 30 31 32 33 34 35 36 37 38 39 40 41 42 43 44 45 46 47 48 49 50 51 52 53 54 55 56 57 58 59 60 61 62 63 64 65 66 #include <vector> void printVector (vector <int >& v) for (vector <int >::iterator it = v.begin(); it != v.end(); it++) { cout << *it << " " ; } cout << endl ; } void test01 () vector <int >v1; for (int i = 0 ; i < 10 ; i++) { v1.push_back(i); } printVector(v1); vector <int >v2; for (int i = 10 ; i > 0 ; i--) { v2.push_back(i); } printVector(v2); cout << "互换后" << endl ; v1.swap(v2); printVector(v1); printVector(v2); } void test02 () vector <int > v; for (int i = 0 ; i < 100000 ; i++) { v.push_back(i); } cout << "v的容量为:" << v.capacity() << endl ; cout << "v的大小为:" << v.size() << endl ; v.resize(3 ); cout << "v的容量为:" << v.capacity() << endl ; cout << "v的大小为:" << v.size() << endl ; vector <int >(v).swap(v); cout << "v的容量为:" << v.capacity() << endl ; cout << "v的大小为:" << v.size() << endl ; } int main () test01(); test02(); system("pause" ); return 0 ; }
总结:swap可以使两个容器互换,可以达到实用的收缩内存效果
vector 预留空间
减少vector在动态扩展容量时的扩展次数
1 2 3 4 5 6 7 8 9 10 11 12 13 14 15 16 17 18 19 20 21 22 23 24 25 26 27 28 29 30 #include <vector> void test01 () vector <int > v; v.reserve(100000 ); int num = 0 ; int * p = NULL ; for (int i = 0 ; i < 100000 ; i++) { v.push_back(i); if (p != &v[0 ]) { p = &v[0 ]; num++; } } cout << "num:" << num << endl ; } int main () test01(); system("pause" ); return 0 ; }
总结:如果数据量较大,可以一开始利用reserve预留空间
deque容器
双端数组,可以对头端进行插入删除操作
vector对于头部的插入删除效率低,数据量越大,效率越低
clip_2.jpg
deque内部工作原理:
deque内部有个中控器,维护每段缓冲区中的内容,缓冲区中存放真实数据
中控器维护的是每个缓冲区的地址,使得使用deque时像一片连续的内存空间
clip_3.jpg
deque容器的迭代器也是支持随机访问的
deque容器构造
1 2 3 4 deque <T> deqT; deque (beg, end); deque (n, elem); deque (const deque &deq);
1 2 3 4 5 6 7 8 9 10 11 12 13 14 15 16 17 18 19 20 21 22 23 24 25 26 27 28 29 30 31 32 33 34 35 36 37 #include <deque> void printDeque (const deque <int >& d) for (deque <int >::const_iterator it = d.begin(); it != d.end(); it++) { cout << *it << " " ; } cout << endl ; } void test01 () deque <int > d1; for (int i = 0 ; i < 10 ; i++) { d1.push_back(i); } printDeque(d1); deque <int > d2 (d1.begin(),d1.end()) printDeque(d2); deque <int >d3(10 ,100 ); printDeque(d3); deque <int >d4 = d3; printDeque(d4); } int main () test01(); system("pause" ); return 0 ; }
总结:deque容器和vector容器的构造方式几乎一致,灵活使用即可
deque赋值操作
给deque容器进行赋值
1 2 3 4 5 deque & operator =(const deque &deq); assign(beg, end); assign(n, elem);
1 2 3 4 5 6 7 8 9 10 11 12 13 14 15 16 17 18 19 20 21 22 23 24 25 26 27 28 29 30 31 32 33 34 35 36 37 38 39 40 41 42 #include <deque> void printDeque (const deque <int >& d) for (deque <int >::const_iterator it = d.begin(); it != d.end(); it++) { cout << *it << " " ; } cout << endl ; } void test01 () deque <int > d1; for (int i = 0 ; i < 10 ; i++) { d1.push_back(i); } printDeque(d1); deque <int >d2; d2 = d1; printDeque(d2); deque <int >d3; d3.assign(d1.begin(), d1.end()); printDeque(d3); deque <int >d4; d4.assign(10 , 100 ); printDeque(d4); } int main () test01(); system("pause" ); return 0 ; }
总结:deque赋值操作也与vector相同,需熟练掌握
deque大小操作
对deque容器的大小进行操作
1 2 3 4 5 6 7 8 9 10 11 deque .empty(); deque .size(); deque .resize(num); deque .resize(num, elem);
1 2 3 4 5 6 7 8 9 10 11 12 13 14 15 16 17 18 19 20 21 22 23 24 25 26 27 28 29 30 31 32 33 34 35 36 37 38 39 40 41 42 43 44 45 46 47 #include <deque> void printDeque (const deque <int >& d) for (deque <int >::const_iterator it = d.begin(); it != d.end(); it++) { cout << *it << " " ; } cout << endl ; } void test01 () deque <int > d1; for (int i = 0 ; i < 10 ; i++) { d1.push_back(i); } printDeque(d1); if (d1.empty()) { cout << "d1为空!" << endl ; } else { cout << "d1不为空!" << endl ; cout << "d1的大小为:" << d1.size() << endl ; } d1.resize(15 , 1 ); printDeque(d1); d1.resize(5 ); printDeque(d1); } int main () test01(); system("pause" ); return 0 ; }
总结:
deque 插入和删除
向deque容器中插入和删除数据
1 2 3 4 5 6 7 8 9 10 11 12 13 14 15 16 17 18 19 20 两端插入操作: push_back(elem); push_front(elem); pop_back(); pop_front(); 指定位置操作: insert(pos,elem); insert(pos,n,elem); insert(pos,beg,end); clear(); erase(beg,end); erase(pos);
1 2 3 4 5 6 7 8 9 10 11 12 13 14 15 16 17 18 19 20 21 22 23 24 25 26 27 28 29 30 31 32 33 34 35 36 37 38 39 40 41 42 43 44 45 46 47 48 49 50 51 52 53 54 55 56 57 58 59 60 61 62 63 64 65 66 67 68 69 70 71 72 73 74 75 76 77 78 79 80 81 82 83 84 85 86 #include <deque> void printDeque (const deque <int >& d) for (deque <int >::const_iterator it = d.begin(); it != d.end(); it++) { cout << *it << " " ; } cout << endl ; } void test01 () deque <int > d; d.push_back(10 ); d.push_back(20 ); d.push_front(100 ); d.push_front(200 ); printDeque(d); d.pop_back(); d.pop_front(); printDeque(d); } void test02 () deque <int > d; d.push_back(10 ); d.push_back(20 ); d.push_front(100 ); d.push_front(200 ); printDeque(d); d.insert(d.begin(), 1000 ); printDeque(d); d.insert(d.begin(), 2 ,10000 ); printDeque(d); deque <int >d2; d2.push_back(1 ); d2.push_back(2 ); d2.push_back(3 ); d.insert(d.begin(), d2.begin(), d2.end()); printDeque(d); } void test03 () deque <int > d; d.push_back(10 ); d.push_back(20 ); d.push_front(100 ); d.push_front(200 ); printDeque(d); d.erase(d.begin()); printDeque(d); d.erase(d.begin(), d.end()); d.clear(); printDeque(d); } int main () test03(); system("pause" ); return 0 ; }
总结:
deque 数据存取
对deque 中的数据的存取操作
1 2 3 4 at(int idx); operator []; front(); back();
1 2 3 4 5 6 7 8 9 10 11 12 13 14 15 16 17 18 19 20 21 22 23 24 25 26 27 28 29 30 31 32 33 34 35 36 37 38 39 40 41 42 43 44 45 46 #include <deque> void printDeque (const deque <int >& d) for (deque <int >::const_iterator it = d.begin(); it != d.end(); it++) { cout << *it << " " ; } cout << endl ; } void test01 () deque <int > d; d.push_back(10 ); d.push_back(20 ); d.push_front(100 ); d.push_front(200 ); for (int i = 0 ; i < d.size(); i++) { cout << d[i] << " " ; } cout << endl ; for (int i = 0 ; i < d.size(); i++) { cout << d.at(i) << " " ; } cout << endl ; cout << "front:" << d.front() << endl ; cout << "back:" << d.back() << endl ; } int main () test01(); system("pause" ); return 0 ; }
总结:
deque 排序
利用算法实现对deque容器进行排序
1 sort(iterator beg, iterator end)
1 2 3 4 5 6 7 8 9 10 11 12 13 14 15 16 17 18 19 20 21 22 23 24 25 26 27 28 29 30 31 32 33 34 35 #include <deque> #include <algorithm> void printDeque (const deque <int >& d) for (deque <int >::const_iterator it = d.begin(); it != d.end(); it++) { cout << *it << " " ; } cout << endl ; } void test01 () deque <int > d; d.push_back(10 ); d.push_back(20 ); d.push_front(100 ); d.push_front(200 ); printDeque(d); sort(d.begin(), d.end()); printDeque(d); } int main () test01(); system("pause" ); return 0 ; }
总结:sort算法非常实用,使用时包含头文件 algorithm 即可
案例-评委打分
实现步骤
1 2 3 4 5 6 7 8 9 10 11 12 13 14 15 16 17 18 19 20 21 22 23 24 25 26 27 28 29 30 31 32 33 34 35 36 37 38 39 40 41 42 43 44 45 46 47 48 49 50 51 52 53 54 55 56 57 58 59 60 61 62 63 64 65 66 67 68 69 70 71 72 73 74 75 76 77 78 79 80 81 82 83 84 85 86 87 88 89 90 91 92 93 94 95 96 97 98 99 100 101 102 103 104 105 106 class Person { public : Person(string name, int score) { this ->m_Name = name; this ->m_Score = score; } string m_Name; int m_Score; }; void createPerson (vector <Person>&v) string nameSeed = "ABCDE" ; for (int i = 0 ; i < 5 ; i++) { string name = "选手" ; name += nameSeed[i]; int score = 0 ; Person p (name, score) ; v.push_back(p); } } void setScore (vector <Person>&v) for (vector <Person>::iterator it = v.begin(); it != v.end(); it++) { deque <int >d; for (int i = 0 ; i < 10 ; i++) { int score = rand() % 41 + 60 ; d.push_back(score); } sort(d.begin(), d.end()); d.pop_back(); d.pop_front(); int sum = 0 ; for (deque <int >::iterator dit = d.begin(); dit != d.end(); dit++) { sum += *dit; } int avg = sum / d.size(); it->m_Score = avg; } } void showScore (vector <Person>&v) for (vector <Person>::iterator it = v.begin(); it != v.end(); it++) { cout << "姓名: " << it->m_Name << " 平均分: " << it->m_Score << endl ; } } int main () srand((unsigned int )time(NULL )); vector <Person>v; createPerson(v); setScore(v); showScore(v); system("pause" ); return 0 ; }
总结:选取不同的容器操作数据,可以提升代码的效率
stack容器
clip_4.jpg
栈中只有顶端的元素才可以被外界使用,因此栈不允许有遍历行为
stack 常用接口
构造函数:
stack stk; //stack采用模板类实现, stack对象的默认构造形式
stack& operator=(const stack &stk); //重载等号操作符
push(elem); //向栈顶添加元素
empty(); //判断堆栈是否为空
1 2 3 4 5 6 7 8 9 10 11 12 13 14 15 16 17 18 19 20 21 22 23 24 25 26 27 28 29 30 31 #include <stack> void test01 () stack <int > s; s.push(10 ); s.push(20 ); s.push(30 ); while (!s.empty()) { cout << "栈顶元素为: " << s.top() << endl ; s.pop(); } cout << "栈的大小为:" << s.size() << endl ; } int main () test01(); system("pause" ); return 0 ; }
总结:
queue 容器
clip_5.jpg
队列容器允许从一端新增元素,从另一端移除元素
队列中只有队头和队尾才可以被外界使用,因此队列不允许有遍历行为
队列中进数据称为 — 入队 push
队列中出数据称为 — 出队 pop
queue 常用接口
构造函数:
queue que; //queue采用模板类实现,queue对象的默认构造形式
queue& operator=(const queue &que); //重载等号操作符
push(elem); //往队尾添加元素
empty(); //判断堆栈是否为空
1 2 3 4 5 6 7 8 9 10 11 12 13 14 15 16 17 18 19 20 21 22 23 24 25 26 27 28 29 30 31 32 33 34 35 36 37 38 39 40 41 42 43 44 45 46 47 48 49 50 51 52 53 54 55 56 57 #include <queue> #include <string> class Person { public : Person(string name, int age) { this ->m_Name = name; this ->m_Age = age; } string m_Name; int m_Age; }; void test01 () queue <Person> q; Person p1 ("唐僧" , 30 ) ; Person p2 ("孙悟空" , 1000 ) ; Person p3 ("猪八戒" , 900 ) ; Person p4 ("沙僧" , 800 ) ; q.push(p1); q.push(p2); q.push(p3); q.push(p4); while (!q.empty()) { cout << "队头元素-- 姓名: " << q.front().m_Name << " 年龄: " << q.front().m_Age << endl ; cout << "队尾元素-- 姓名: " << q.back().m_Name << " 年龄: " << q.back().m_Age << endl ; cout << endl ; q.pop(); } cout << "队列大小为:" << q.size() << endl ; } int main () test01(); system("pause" ); return 0 ; }
总结:
list容器功能: 将数据进行链式存储
链表(list)是一种物理存储单元上非连续的存储结构,数据元素的逻辑顺序是通过链表中的指针链接实现的
链表的组成:链表由一系列结点组成
结点的组成:一个是存储数据元素的数据域,另一个是存储下一个结点地址的指针域
STL中的链表是一个双向循环链表
clip_6.jpg
由于链表的存储方式并不是连续的内存空间,因此链表list中的迭代器只支持前移和后移,属于双向迭代器
list的优点:
采用动态存储分配,不会造成内存浪费和溢出
链表灵活,但是空间(指针域) 和 时间(遍历)额外耗费较大
总结:STL中List和vector是两个最常被使用的容器,各有优缺点
list构造函数
创建list容器
1 2 3 4 list <T> lst; list (beg,end); list (n,elem); list (const list &lst);
1 2 3 4 5 6 7 8 9 10 11 12 13 14 15 16 17 18 19 20 21 22 23 24 25 26 27 28 29 30 31 32 33 34 35 36 37 38 #include <list> void printList (const list <int >& L) for (list <int >::const_iterator it = L.begin(); it != L.end(); it++) { cout << *it << " " ; } cout << endl ; } void test01 () list <int >L1; L1.push_back(10 ); L1.push_back(20 ); L1.push_back(30 ); L1.push_back(40 ); printList(L1); list <int >L2(L1.begin(),L1.end()); printList(L2); list <int >L3(L2); printList(L3); list <int >L4(10 , 1000 ); printList(L4); } int main () test01(); system("pause" ); return 0 ; }
总结:list 构造方式同其他几个STL常用容器,熟练掌握即可
list 赋值和交换
给list容器进行赋值,以及交换list容器
1 2 3 4 assign(beg, end); assign(n, elem); list & operator =(const list &lst); swap(lst);
1 2 3 4 5 6 7 8 9 10 11 12 13 14 15 16 17 18 19 20 21 22 23 24 25 26 27 28 29 30 31 32 33 34 35 36 37 38 39 40 41 42 43 44 45 46 47 48 49 50 51 52 53 54 55 56 57 58 59 60 61 62 63 64 65 66 67 68 69 70 71 72 #include <list> void printList (const list <int >& L) for (list <int >::const_iterator it = L.begin(); it != L.end(); it++) { cout << *it << " " ; } cout << endl ; } void test01 () list <int >L1; L1.push_back(10 ); L1.push_back(20 ); L1.push_back(30 ); L1.push_back(40 ); printList(L1); list <int >L2; L2 = L1; printList(L2); list <int >L3; L3.assign(L2.begin(), L2.end()); printList(L3); list <int >L4; L4.assign(10 , 100 ); printList(L4); } void test02 () list <int >L1; L1.push_back(10 ); L1.push_back(20 ); L1.push_back(30 ); L1.push_back(40 ); list <int >L2; L2.assign(10 , 100 ); cout << "交换前: " << endl ; printList(L1); printList(L2); cout << endl ; L1.swap(L2); cout << "交换后: " << endl ; printList(L1); printList(L2); } int main () test02(); system("pause" ); return 0 ; }
总结:list赋值和交换操作能够灵活运用即可
3.7.4 list 大小操作
对list容器的大小进行操作
size(); //返回容器中元素的个数
empty(); //判断容器是否为空
resize(num); //重新指定容器的长度为num,若容器变长,则以默认值填充新位置。
//如果容器变短,则末尾超出容器长度的元素被删除。
resize(num, elem); //重新指定容器的长度为num,若容器变长,则以elem值填充新位置。
//如果容器变短,则末尾超出容器长度的元素被删除。
1 2 3 4 5 6 7 8 9 10 11 12 13 14 15 16 17 18 19 20 21 22 23 24 25 26 27 28 29 30 31 32 33 34 35 36 37 38 39 40 41 42 43 44 45 #include <list> void printList (const list <int >& L) for (list <int >::const_iterator it = L.begin(); it != L.end(); it++) { cout << *it << " " ; } cout << endl ; } void test01 () list <int >L1; L1.push_back(10 ); L1.push_back(20 ); L1.push_back(30 ); L1.push_back(40 ); if (L1.empty()) { cout << "L1为空" << endl ; } else { cout << "L1不为空" << endl ; cout << "L1的大小为: " << L1.size() << endl ; } L1.resize(10 ); printList(L1); L1.resize(2 ); printList(L1); } int main () test01(); system("pause" ); return 0 ; }
总结:
判断是否为空 — empty
对list容器进行数据的插入和删除
push_back(elem);//在容器尾部加入一个元素
1 2 3 4 5 6 7 8 9 10 11 12 13 14 15 16 17 18 19 20 21 22 23 24 25 26 27 28 29 30 31 32 33 34 35 36 37 38 39 40 41 42 43 44 45 46 47 48 49 50 51 52 53 54 55 56 57 58 59 60 61 62 63 64 #include <list> void printList (const list <int >& L) for (list <int >::const_iterator it = L.begin(); it != L.end(); it++) { cout << *it << " " ; } cout << endl ; } void test01 () list <int > L; L.push_back(10 ); L.push_back(20 ); L.push_back(30 ); L.push_front(100 ); L.push_front(200 ); L.push_front(300 ); printList(L); L.pop_back(); printList(L); L.pop_front(); printList(L); list <int >::iterator it = L.begin(); L.insert(++it, 1000 ); printList(L); it = L.begin(); L.erase(++it); printList(L); L.push_back(10000 ); L.push_back(10000 ); L.push_back(10000 ); printList(L); L.remove(10000 ); printList(L); L.clear(); printList(L); } int main () test01(); system("pause" ); return 0 ; }
总结:
尾插 — push_back
对list容器中数据进行存取
front(); //返回第一个元素。
1 2 3 4 5 6 7 8 9 10 11 12 13 14 15 16 17 18 19 20 21 22 23 24 25 26 27 28 29 30 #include <list> void test01 () list <int >L1; L1.push_back(10 ); L1.push_back(20 ); L1.push_back(30 ); L1.push_back(40 ); cout << "第一个元素为: " << L1.front() << endl ; cout << "最后一个元素为: " << L1.back() << endl ; list <int >::iterator it = L1.begin(); } int main () test01(); system("pause" ); return 0 ; }
总结:
list容器中不可以通过[]或者at方式访问数据
将容器中的元素反转,以及将容器中的数据进行排序
reverse(); //反转链表
1 2 3 4 5 6 7 8 9 10 11 12 13 14 15 16 17 18 19 20 21 22 23 24 25 26 27 28 29 30 31 32 33 34 35 36 37 38 39 40 41 42 43 void printList (const list <int >& L) for (list <int >::const_iterator it = L.begin(); it != L.end(); it++) { cout << *it << " " ; } cout << endl ; } bool myCompare (int val1 , int val2) return val1 > val2; } void test01 () list <int > L; L.push_back(90 ); L.push_back(30 ); L.push_back(20 ); L.push_back(70 ); printList(L); L.reverse(); printList(L); L.sort(); printList(L); L.sort(myCompare); printList(L); } int main () test01(); system("pause" ); return 0 ; }
总结:
反转 — reverse
排序规则:按照年龄进行升序,如果年龄相同按照身高进行降序
1 2 3 4 5 6 7 8 9 10 11 12 13 14 15 16 17 18 19 20 21 22 23 24 25 26 27 28 29 30 31 32 33 34 35 36 37 38 39 40 41 42 43 44 45 46 47 48 49 50 51 52 53 54 55 56 57 58 59 60 61 62 63 64 65 66 67 68 69 #include <list> #include <string> class Person {public : Person(string name, int age , int height) { m_Name = name; m_Age = age; m_Height = height; } public : string m_Name; int m_Age; int m_Height; }; bool ComparePerson (Person& p1, Person& p2) if (p1.m_Age == p2.m_Age) { return p1.m_Height > p2.m_Height; } else { return p1.m_Age < p2.m_Age; } } void test01 () list <Person> L; Person p1 ("刘备" , 35 , 175 ) ; Person p2 ("曹操" , 45 , 180 ) ; Person p3 ("孙权" , 40 , 170 ) ; Person p4 ("赵云" , 25 , 190 ) ; Person p5 ("张飞" , 35 , 160 ) ; Person p6 ("关羽" , 35 , 200 ) ; L.push_back(p1); L.push_back(p2); L.push_back(p3); L.push_back(p4); L.push_back(p5); L.push_back(p6); for (list <Person>::iterator it = L.begin(); it != L.end(); it++) { cout << "姓名: " << it->m_Name << " 年龄: " << it->m_Age << " 身高: " << it->m_Height << endl ; } cout << "---------------------------------" << endl ; L.sort(ComparePerson); for (list <Person>::iterator it = L.begin(); it != L.end(); it++) { cout << "姓名: " << it->m_Name << " 年龄: " << it->m_Age << " 身高: " << it->m_Height << endl ; } } int main () test01(); system("pause" ); return 0 ; }
总结:
对于自定义数据类型,必须要指定排序规则,否则编译器不知道如何进行排序
高级排序只是在排序规则上再进行一次逻辑规则制定,并不复杂
3.8 set/ multiset 容器
所有元素都会在插入时自动被排序
set/multiset属于关联式容器,底层结构是用二叉树实现。
set不允许容器中有重复的元素
构造:
set st; //默认构造函数:
set& operator=(const set &st); //重载等号操作符
1 2 3 4 5 6 7 8 9 10 11 12 13 14 15 16 17 18 19 20 21 22 23 24 25 26 27 28 29 30 31 32 33 34 35 36 37 38 39 40 #include <set> void printSet (set <int > & s) for (set <int >::iterator it = s.begin(); it != s.end(); it++) { cout << *it << " " ; } cout << endl ; } void test01 () set <int > s1; s1.insert(10 ); s1.insert(30 ); s1.insert(20 ); s1.insert(40 ); printSet(s1); set <int >s2(s1); printSet(s2); set <int >s3; s3 = s2; printSet(s3); } int main () test01(); system("pause" ); return 0 ; }
总结:
set容器插入数据时用insert
统计set容器大小以及交换set容器
size(); //返回容器中元素的数目
1 2 3 4 5 6 7 8 9 10 11 12 13 14 15 16 17 18 19 20 21 22 23 24 25 26 27 28 29 30 31 32 33 34 35 36 37 38 39 40 41 42 43 44 45 46 47 48 49 50 51 52 53 54 55 56 57 58 59 60 61 62 63 64 65 66 67 68 69 70 71 72 #include <set> void printSet (set <int > & s) for (set <int >::iterator it = s.begin(); it != s.end(); it++) { cout << *it << " " ; } cout << endl ; } void test01 () set <int > s1; s1.insert(10 ); s1.insert(30 ); s1.insert(20 ); s1.insert(40 ); if (s1.empty()) { cout << "s1为空" << endl ; } else { cout << "s1不为空" << endl ; cout << "s1的大小为: " << s1.size() << endl ; } } void test02 () set <int > s1; s1.insert(10 ); s1.insert(30 ); s1.insert(20 ); s1.insert(40 ); set <int > s2; s2.insert(100 ); s2.insert(300 ); s2.insert(200 ); s2.insert(400 ); cout << "交换前" << endl ; printSet(s1); printSet(s2); cout << endl ; cout << "交换后" << endl ; s1.swap(s2); printSet(s1); printSet(s2); } int main () test02(); system("pause" ); return 0 ; }
总结:
统计大小 — size
set容器进行插入数据和删除数据
insert(elem); //在容器中插入元素。
1 2 3 4 5 6 7 8 9 10 11 12 13 14 15 16 17 18 19 20 21 22 23 24 25 26 27 28 29 30 31 32 33 34 35 36 37 38 39 40 41 42 43 #include <set> void printSet (set <int > & s) for (set <int >::iterator it = s.begin(); it != s.end(); it++) { cout << *it << " " ; } cout << endl ; } void test01 () set <int > s1; s1.insert(10 ); s1.insert(30 ); s1.insert(20 ); s1.insert(40 ); printSet(s1); s1.erase(s1.begin()); printSet(s1); s1.erase(30 ); printSet(s1); s1.clear(); printSet(s1); } int main () test01(); system("pause" ); return 0 ; }
总结:
插入 — insert
对set容器进行查找数据以及统计数据
find(key); //查找key是否存在,若存在,返回该键的元素的迭代器;若不存在,返回set.end();
1 2 3 4 5 6 7 8 9 10 11 12 13 14 15 16 17 18 19 20 21 22 23 24 25 26 27 28 29 30 31 32 33 34 35 36 37 #include <set> void test01 () set <int > s1; s1.insert(10 ); s1.insert(30 ); s1.insert(20 ); s1.insert(40 ); set <int >::iterator pos = s1.find(30 ); if (pos != s1.end()) { cout << "找到了元素 : " << *pos << endl ; } else { cout << "未找到元素" << endl ; } int num = s1.count(30 ); cout << "num = " << num << endl ; } int main () test01(); system("pause" ); return 0 ; }
总结:
查找 — find (返回的是迭代器)
掌握set和multiset的区别
set不可以插入重复数据,而multiset可以
1 2 3 4 5 6 7 8 9 10 11 12 13 14 15 16 17 18 19 20 21 22 23 24 25 26 27 28 29 30 31 32 33 34 35 36 37 38 39 40 41 #include <set> void test01 () set <int > s; pair <set <int >::iterator, bool > ret = s.insert(10 ); if (ret.second) { cout << "第一次插入成功!" << endl ; } else { cout << "第一次插入失败!" << endl ; } ret = s.insert(10 ); if (ret.second) { cout << "第二次插入成功!" << endl ; } else { cout << "第二次插入失败!" << endl ; } multiset <int > ms; ms.insert(10 ); ms.insert(10 ); for (multiset <int >::iterator it = ms.begin(); it != ms.end(); it++) { cout << *it << " " ; } cout << endl ; } int main () test01(); system("pause" ); return 0 ; }
总结:
如果不允许插入重复数据可以利用set
成对出现的数据,利用对组可以返回两个数据
pair<type, type> p ( value1, value2 );
1 2 3 4 5 6 7 8 9 10 11 12 13 14 15 16 17 18 19 20 #include <string> void test01 () pair<string, int> p(string("Tom"), 20); cout << "姓名: " << p.first << " 年龄: " << p.second << endl ; pair <string , int > p2 = make_pair ("Jerry" , 10 ); cout << "姓名: " << p2.first << " 年龄: " << p2.second << endl ; } int main () test01(); system("pause" ); return 0 ; }
总结:
两种方式都可以创建对组,记住一种即可
3.8.8 set容器排序
set容器默认排序规则为从小到大,掌握如何改变排序规则
利用仿函数,可以改变排序规则
1 2 3 4 5 6 7 8 9 10 11 12 13 14 15 16 17 18 19 20 21 22 23 24 25 26 27 28 29 30 31 32 33 34 35 36 37 38 39 40 41 42 43 44 45 46 #include <set> class MyCompare { public : bool operator () (int v1, int v2) return v1 > v2; } }; void test01 () set <int > s1; s1.insert(10 ); s1.insert(40 ); s1.insert(20 ); s1.insert(30 ); s1.insert(50 ); for (set <int >::iterator it = s1.begin(); it != s1.end(); it++) { cout << *it << " " ; } cout << endl ; set <int ,MyCompare> s2; s2.insert(10 ); s2.insert(40 ); s2.insert(20 ); s2.insert(30 ); s2.insert(50 ); for (set <int , MyCompare>::iterator it = s2.begin(); it != s2.end(); it++) { cout << *it << " " ; } cout << endl ; } int main () test01(); system("pause" ); return 0 ; }
总结:利用仿函数可以指定set容器的排序规则
示例二 set存放自定义数据类型
1 2 3 4 5 6 7 8 9 10 11 12 13 14 15 16 17 18 19 20 21 22 23 24 25 26 27 28 29 30 31 32 33 34 35 36 37 38 39 40 41 42 43 44 45 46 47 48 49 50 51 52 53 #include <set> #include <string> class Person { public : Person(string name, int age) { this ->m_Name = name; this ->m_Age = age; } string m_Name; int m_Age; }; class comparePerson { public : bool operator () (const Person& p1, const Person &p2) { return p1.m_Age > p2.m_Age; } }; void test01 () set <Person, comparePerson> s; Person p1 ("刘备" , 23 ) ; Person p2 ("关羽" , 27 ) ; Person p3 ("张飞" , 25 ) ; Person p4 ("赵云" , 21 ) ; s.insert(p1); s.insert(p2); s.insert(p3); s.insert(p4); for (set <Person, comparePerson>::iterator it = s.begin(); it != s.end(); it++) { cout << "姓名: " << it->m_Name << " 年龄: " << it->m_Age << endl ; } } int main () test01(); system("pause" ); return 0 ; }
总结:
对于自定义数据类型,set必须指定排序规则才可以插入数据
3.9 map/ multimap容器
map中所有元素都是pair
map/multimap属于关联式容器,底层结构是用二叉树实现。
可以根据key值快速找到value值
map不允许容器中有重复key值元素
对map容器进行构造和赋值操作
构造:
map<T1, T2> mp; //map默认构造函数:
map& operator=(const map &mp); //重载等号操作符
1 2 3 4 5 6 7 8 9 10 11 12 13 14 15 16 17 18 19 20 21 22 23 24 25 26 27 28 29 30 31 32 33 34 35 #include <map> void printMap (map <int ,int >&m) for (map <int , int >::iterator it = m.begin(); it != m.end(); it++) { cout << "key = " << it->first << " value = " << it->second << endl ; } cout << endl ; } void test01 () map <int ,int >m; m.insert(pair <int , int >(1 , 10 )); m.insert(pair <int , int >(2 , 20 )); m.insert(pair <int , int >(3 , 30 )); printMap(m); map <int , int >m2(m); printMap(m2); map <int , int >m3; m3 = m2; printMap(m3); } int main () test01(); system("pause" ); return 0 ; }
总结:map中所有元素都是成对出现,插入数据时候要使用对组
3.9.3 map大小和交换
统计map容器大小以及交换map容器
size(); //返回容器中元素的数目
1 2 3 4 5 6 7 8 9 10 11 12 13 14 15 16 17 18 19 20 21 22 23 24 25 26 27 28 29 30 31 32 33 34 35 36 37 38 39 40 41 42 43 44 45 46 47 48 49 50 51 52 53 54 55 56 57 58 59 60 61 62 63 #include <map> void printMap (map <int ,int >&m) for (map <int , int >::iterator it = m.begin(); it != m.end(); it++) { cout << "key = " << it->first << " value = " << it->second << endl ; } cout << endl ; } void test01 () map <int , int >m; m.insert(pair <int , int >(1 , 10 )); m.insert(pair <int , int >(2 , 20 )); m.insert(pair <int , int >(3 , 30 )); if (m.empty()) { cout << "m为空" << endl ; } else { cout << "m不为空" << endl ; cout << "m的大小为: " << m.size() << endl ; } } void test02 () map <int , int >m; m.insert(pair <int , int >(1 , 10 )); m.insert(pair <int , int >(2 , 20 )); m.insert(pair <int , int >(3 , 30 )); map <int , int >m2; m2.insert(pair <int , int >(4 , 100 )); m2.insert(pair <int , int >(5 , 200 )); m2.insert(pair <int , int >(6 , 300 )); cout << "交换前" << endl ; printMap(m); printMap(m2); cout << "交换后" << endl ; m.swap(m2); printMap(m); printMap(m2); } int main () test01(); test02(); system("pause" ); return 0 ; }
总结:
统计大小 — size
map容器进行插入数据和删除数据
insert(elem); //在容器中插入元素。
1 2 3 4 5 6 7 8 9 10 11 12 13 14 15 16 17 18 19 20 21 22 23 24 25 26 27 28 29 30 31 32 33 34 35 36 37 38 39 40 41 42 43 44 45 46 #include <map> void printMap (map <int ,int >&m) for (map <int , int >::iterator it = m.begin(); it != m.end(); it++) { cout << "key = " << it->first << " value = " << it->second << endl ; } cout << endl ; } void test01 () map <int , int > m; m.insert(pair <int , int >(1 , 10 )); m.insert(make_pair (2 , 20 )); m.insert(map <int , int >::value_type(3 , 30 )); m[4 ] = 40 ; printMap(m); m.erase(m.begin()); printMap(m); m.erase(3 ); printMap(m); m.erase(m.begin(),m.end()); m.clear(); printMap(m); } int main () test01(); system("pause" ); return 0 ; }
总结:
map插入方式很多,记住其一即可
对map容器进行查找数据以及统计数据
find(key); //查找key是否存在,若存在,返回该键的元素的迭代器;若不存在,返回set.end();
1 2 3 4 5 6 7 8 9 10 11 12 13 14 15 16 17 18 19 20 21 22 23 24 25 26 27 28 29 30 31 32 33 34 35 #include <map> void test01 () map <int , int >m; m.insert(pair <int , int >(1 , 10 )); m.insert(pair <int , int >(2 , 20 )); m.insert(pair <int , int >(3 , 30 )); map <int , int >::iterator pos = m.find(3 ); if (pos != m.end()) { cout << "找到了元素 key = " << (*pos).first << " value = " << (*pos).second << endl ; } else { cout << "未找到元素" << endl ; } int num = m.count(3 ); cout << "num = " << num << endl ; } int main () test01(); system("pause" ); return 0 ; }
总结:
查找 — find (返回的是迭代器)
map容器默认排序规则为 按照key值进行 从小到大排序,掌握如何改变排序规则
利用仿函数,可以改变排序规则
1 2 3 4 5 6 7 8 9 10 11 12 13 14 15 16 17 18 19 20 21 22 23 24 25 26 27 28 29 30 31 32 33 #include <map> class MyCompare {public : bool operator () (int v1, int v2) return v1 > v2; } }; void test01 () map <int , int , MyCompare> m; m.insert(make_pair (1 , 10 )); m.insert(make_pair (2 , 20 )); m.insert(make_pair (3 , 30 )); m.insert(make_pair (4 , 40 )); m.insert(make_pair (5 , 50 )); for (map <int , int , MyCompare>::iterator it = m.begin(); it != m.end(); it++) { cout << "key:" << it->first << " value:" << it->second << endl ; } } int main () test01(); system("pause" ); return 0 ; }
总结:
利用仿函数可以指定map容器的排序规则
1 2 3 4 5 6 7 8 9 10 11 12 13 14 15 16 17 18 19 20 21 22 23 24 25 26 27 28 29 30 31 32 33 34 35 36 37 38 39 40 41 42 43 44 45 46 47 48 49 50 51 52 53 54 55 56 57 58 59 60 61 62 63 64 65 66 67 68 69 70 71 72 73 74 75 76 77 78 79 80 81 82 83 84 85 86 87 88 89 90 91 92 93 94 95 96 97 98 99 100 101 102 103 104 105 106 107 108 109 110 111 112 113 114 115 116 #include <iostream> using namespace std ;#include <vector> #include <string> #include <map> #include <ctime> #define CEHUA 0 #define MEISHU 1 #define YANFA 2 class Worker { public : string m_Name; int m_Salary; }; void createWorker (vector <Worker>&v) string nameSeed = "ABCDEFGHIJ" ; for (int i = 0 ; i < 10 ; i++) { Worker worker; worker.m_Name = "员工" ; worker.m_Name += nameSeed[i]; worker.m_Salary = rand() % 10000 + 10000 ; v.push_back(worker); } } void setGroup (vector <Worker>&v,multimap <int ,Worker>&m) for (vector <Worker>::iterator it = v.begin(); it != v.end(); it++) { int deptId = rand() % 3 ; m.insert(make_pair (deptId, *it)); } } void showWorkerByGourp (multimap <int ,Worker>&m) cout << "策划部门:" << endl ; multimap <int ,Worker>::iterator pos = m.find(CEHUA); int count = m.count(CEHUA); int index = 0 ; for (; pos != m.end() && index < count; pos++ , index++) { cout << "姓名: " << pos->second.m_Name << " 工资: " << pos->second.m_Salary << endl ; } cout << "----------------------" << endl ; cout << "美术部门: " << endl ; pos = m.find(MEISHU); count = m.count(MEISHU); index = 0 ; for (; pos != m.end() && index < count; pos++, index++) { cout << "姓名: " << pos->second.m_Name << " 工资: " << pos->second.m_Salary << endl ; } cout << "----------------------" << endl ; cout << "研发部门: " << endl ; pos = m.find(YANFA); count = m.count(YANFA); index = 0 ; for (; pos != m.end() && index < count; pos++, index++) { cout << "姓名: " << pos->second.m_Name << " 工资: " << pos->second.m_Salary << endl ; } } int main () srand((unsigned int )time(NULL )); vector <Worker>vWorker; createWorker(vWorker); multimap <int , Worker>mWorker; setGroup(vWorker, mWorker); showWorkerByGourp(mWorker); system("pause" ); return 0 ; }
总结:
当数据以键值对形式存在,可以考虑用map 或 multimap
重载函数调用操作符的类,其对象常称为函数对象
函数对象(仿函数)是一个类,不是一个函数
4.1.2 函数对象使用
函数对象在使用时,可以像普通函数那样调用, 可以有参数,可以有返回值
1 2 3 4 5 6 7 8 9 10 11 12 13 14 15 16 17 18 19 20 21 22 23 24 25 26 27 28 29 30 31 32 33 34 35 36 37 38 39 40 41 42 43 44 45 46 47 48 49 50 51 52 53 54 55 56 57 58 59 60 61 62 63 64 65 #include <string> class MyAdd { public : int operator () (int v1,int v2) { return v1 + v2; } }; void test01 () MyAdd myAdd; cout << myAdd(10 , 10 ) << endl ; } class MyPrint { public : MyPrint() { count = 0 ; } void operator () (string test) { cout << test << endl ; count++; } int count; }; void test02 () MyPrint myPrint; myPrint("hello world" ); myPrint("hello world" ); myPrint("hello world" ); cout << "myPrint调用次数为: " << myPrint.count << endl ; } void doPrint (MyPrint &mp , string test) mp(test); } void test03 () MyPrint myPrint; doPrint(myPrint, "Hello C++" ); } int main () test03(); system("pause" ); return 0 ; }
总结:
仿函数写法非常灵活,可以作为参数进行传递。
返回bool类型的仿函数称为谓词
1 2 3 4 5 6 7 8 9 10 11 12 13 14 15 16 17 18 19 20 21 22 23 24 25 26 27 28 29 30 31 32 33 34 35 36 #include <vector> #include <algorithm> struct GreaterFive { bool operator () (int val) return val > 5 ; } }; void test01 () vector <int > v; for (int i = 0 ; i < 10 ; i++) { v.push_back(i); } vector <int >::iterator it = find_if(v.begin(), v.end(), GreaterFive()); if (it == v.end()) { cout << "没找到!" << endl ; } else { cout << "找到:" << *it << endl ; } } int main () test01(); system("pause" ); return 0 ; }
总结:参数只有一个的谓词,称为一元谓词
4.2.3 二元谓词
1 2 3 4 5 6 7 8 9 10 11 12 13 14 15 16 17 18 19 20 21 22 23 24 25 26 27 28 29 30 31 32 33 34 35 36 37 38 39 40 41 42 43 44 45 46 47 #include <vector> #include <algorithm> class MyCompare { public : bool operator () (int num1, int num2) { return num1 > num2; } }; void test01 () vector <int > v; v.push_back(10 ); v.push_back(40 ); v.push_back(20 ); v.push_back(30 ); v.push_back(50 ); sort(v.begin(), v.end()); for (vector <int >::iterator it = v.begin(); it != v.end(); it++) { cout << *it << " " ; } cout << endl ; cout << "----------------------------" << endl ; sort(v.begin(), v.end(), MyCompare()); for (vector <int >::iterator it = v.begin(); it != v.end(); it++) { cout << *it << " " ; } cout << endl ; } int main () test01(); system("pause" ); return 0 ; }
总结:参数只有两个的谓词,称为二元谓词
4.3 内建函数对象
STL内建了一些函数对象
算术仿函数
关系仿函数
逻辑仿函数
用法:
这些仿函数所产生的对象,用法和一般函数完全相同
实现四则运算
template T plus //加法仿函数 T minus //减法仿函数 T multiplies //乘法仿函数 T divides //除法仿函数 T modulus //取模仿函数 T negate //取反仿函数
1 2 3 4 5 6 7 8 9 10 11 12 13 14 15 16 17 18 19 20 21 22 23 24 #include <functional> void test01 () negate<int > n; cout << n(50 ) << endl ; } void test02 () plus<int > p; cout << p(10 , 20 ) << endl ; } int main () test01(); test02(); system("pause" ); return 0 ; }
总结:使用内建函数对象时,需要引入头文件 #include
4.3.3 关系仿函数
实现关系对比
template bool equal_to //等于 bool not_equal_to //不等于 bool greater //大于 bool greater_equal //大于等于 bool less //小于 bool less_equal //小于等于
1 2 3 4 5 6 7 8 9 10 11 12 13 14 15 16 17 18 19 20 21 22 23 24 25 26 27 28 29 30 31 32 33 34 35 36 37 38 39 40 41 42 43 44 45 46 #include <functional> #include <vector> #include <algorithm> class MyCompare { public : bool operator () (int v1,int v2) { return v1 > v2; } }; void test01 () vector <int > v; v.push_back(10 ); v.push_back(30 ); v.push_back(50 ); v.push_back(40 ); v.push_back(20 ); for (vector <int >::iterator it = v.begin(); it != v.end(); it++) { cout << *it << " " ; } cout << endl ; sort(v.begin(), v.end(), greater<int >()); for (vector <int >::iterator it = v.begin(); it != v.end(); it++) { cout << *it << " " ; } cout << endl ; } int main () test01(); system("pause" ); return 0 ; }
总结:关系仿函数中最常用的就是greater<>大于
4.3.4 逻辑仿函数
实现逻辑运算
template bool logical_and //逻辑与 bool logical_or //逻辑或 bool logical_not //逻辑非
1 2 3 4 5 6 7 8 9 10 11 12 13 14 15 16 17 18 19 20 21 22 23 24 25 26 27 28 29 30 31 32 33 34 35 36 #include <vector> #include <functional> #include <algorithm> void test01 () vector <bool > v; v.push_back(true ); v.push_back(false ); v.push_back(true ); v.push_back(false ); for (vector <bool >::iterator it = v.begin();it!= v.end();it++) { cout << *it << " " ; } cout << endl ; vector <bool > v2; v2.resize(v.size()); transform(v.begin(), v.end(), v2.begin(), logical_not<bool >()); for (vector <bool >::iterator it = v2.begin(); it != v2.end(); it++) { cout << *it << " " ; } cout << endl ; } int main () test01(); system("pause" ); return 0 ; }
总结:逻辑仿函数实际应用较少,了解即可
5 STL- 常用算法
算法主要是由头文件 组成。
是所有STL头文件中最大的一个,范围涉及到比较、 交换、查找、遍历操作、复制、修改等等
体积很小,只包括几个在序列上面进行简单数学运算的模板函数
定义了一些模板类,用以声明函数对象。
5.1 常用遍历算法
掌握常用的遍历算法
for_each //遍历容器
实现遍历容器
for_each(iterator beg, iterator end, _func);
// 遍历算法 遍历容器元素
// beg 开始迭代器
// end 结束迭代器
// _func 函数或者函数对象
1 2 3 4 5 6 7 8 9 10 11 12 13 14 15 16 17 18 19 20 21 22 23 24 25 26 27 28 29 30 31 32 33 34 35 36 37 38 39 40 41 42 43 #include <algorithm> #include <vector> void print01 (int val) cout << val << " " ; } class print02 { public : void operator () (int val) { cout << val << " " ; } }; void test01 () vector <int > v; for (int i = 0 ; i < 10 ; i++) { v.push_back(i); } for_each(v.begin(), v.end(), print01); cout << endl ; for_each(v.begin(), v.end(), print02()); cout << endl ; } int main () test01(); system("pause" ); return 0 ; }
总结:**for_each在实际开发中是最常用遍历算法,需要熟练掌握
5.1.2 transform
搬运容器到另一个容器中
transform(iterator beg1, iterator end1, iterator beg2, _func);
//end1 源容器结束迭代器
//beg2 目标容器开始迭代器
//_func 函数或者函数对象
1 2 3 4 5 6 7 8 9 10 11 12 13 14 15 16 17 18 19 20 21 22 23 24 25 26 27 28 29 30 31 32 33 34 35 36 37 38 39 40 41 42 43 44 45 46 47 48 49 #include <vector> #include <algorithm> class TransForm { public : int operator () (int val) { return val; } }; class MyPrint { public : void operator () (int val) { cout << val << " " ; } }; void test01 () vector <int >v; for (int i = 0 ; i < 10 ; i++) { v.push_back(i); } vector <int >vTarget; vTarget.resize(v.size()); transform(v.begin(), v.end(), vTarget.begin(), TransForm()); for_each(vTarget.begin(), vTarget.end(), MyPrint()); } int main () test01(); system("pause" ); return 0 ; }
总结: 搬运的目标容器必须要提前开辟空间,否则无法正常搬运
5.2 常用查找算法
掌握常用的查找算法
find //查找元素
查找指定元素,找到返回指定元素的迭代器,找不到返回结束迭代器end()
find(iterator beg, iterator end, value);
// 按值查找元素,找到返回指定位置迭代器,找不到返回结束迭代器位置
// beg 开始迭代器
// end 结束迭代器
// value 查找的元素
1 2 3 4 5 6 7 8 9 10 11 12 13 14 15 16 17 18 19 20 21 22 23 24 25 26 27 28 29 30 31 32 33 34 35 36 37 38 39 40 41 42 43 44 45 46 47 48 49 50 51 52 53 54 55 56 57 58 59 60 61 62 63 64 65 66 67 68 #include <algorithm> #include <vector> #include <string> void test01 () vector <int > v; for (int i = 0 ; i < 10 ; i++) { v.push_back(i + 1 ); } vector <int >::iterator it = find(v.begin(), v.end(), 5 ); if (it == v.end()) { cout << "没有找到!" << endl ; } else { cout << "找到:" << *it << endl ; } } class Person {public : Person(string name, int age) { this ->m_Name = name; this ->m_Age = age; } bool operator ==(const Person& p) { if (this ->m_Name == p.m_Name && this ->m_Age == p.m_Age) { return true ; } return false ; } public : string m_Name; int m_Age; }; void test02 () vector <Person> v; Person p1 ("aaa" , 10 ) ; Person p2 ("bbb" , 20 ) ; Person p3 ("ccc" , 30 ) ; Person p4 ("ddd" , 40 ) ; v.push_back(p1); v.push_back(p2); v.push_back(p3); v.push_back(p4); vector <Person>::iterator it = find(v.begin(), v.end(), p2); if (it == v.end()) { cout << "没有找到!" << endl ; } else { cout << "找到姓名:" << it->m_Name << " 年龄: " << it->m_Age << endl ; } }
总结: 利用find可以在容器中找指定的元素,返回值是迭代器
5.2.2 find_if
按条件查找元素
find_if(iterator beg, iterator end, _Pred);
// 按值查找元素,找到返回指定位置迭代器,找不到返回结束迭代器位置
// beg 开始迭代器
// end 结束迭代器
// _Pred 函数或者谓词(返回bool类型的仿函数)
1 2 3 4 5 6 7 8 9 10 11 12 13 14 15 16 17 18 19 20 21 22 23 24 25 26 27 28 29 30 31 32 33 34 35 36 37 38 39 40 41 42 43 44 45 46 47 48 49 50 51 52 53 54 55 56 57 58 59 60 61 62 63 64 65 66 67 68 69 70 71 72 73 74 75 76 77 78 79 80 81 82 83 84 85 86 87 88 89 #include <algorithm> #include <vector> #include <string> class GreaterFive { public : bool operator () (int val) { return val > 5 ; } }; void test01 () vector <int > v; for (int i = 0 ; i < 10 ; i++) { v.push_back(i + 1 ); } vector <int >::iterator it = find_if(v.begin(), v.end(), GreaterFive()); if (it == v.end()) { cout << "没有找到!" << endl ; } else { cout << "找到大于5的数字:" << *it << endl ; } } class Person {public : Person(string name, int age) { this ->m_Name = name; this ->m_Age = age; } public : string m_Name; int m_Age; }; class Greater20 { public : bool operator () (Person &p) { return p.m_Age > 20 ; } }; void test02 () vector <Person> v; Person p1 ("aaa" , 10 ) ; Person p2 ("bbb" , 20 ) ; Person p3 ("ccc" , 30 ) ; Person p4 ("ddd" , 40 ) ; v.push_back(p1); v.push_back(p2); v.push_back(p3); v.push_back(p4); vector <Person>::iterator it = find_if(v.begin(), v.end(), Greater20()); if (it == v.end()) { cout << "没有找到!" << endl ; } else { cout << "找到姓名:" << it->m_Name << " 年龄: " << it->m_Age << endl ; } } int main () test02(); system("pause" ); return 0 ; }
总结:find_if按条件查找使查找更加灵活,提供的仿函数可以改变不同的策略
5.2.3 adjacent_find
查找相邻重复元素
adjacent_find(iterator beg, iterator end);
// 查找相邻重复元素,返回相邻元素的第一个位置的迭代器
// beg 开始迭代器
// end 结束迭代器
1 2 3 4 5 6 7 8 9 10 11 12 13 14 15 16 17 18 19 20 21 22 23 #include <algorithm> #include <vector> void test01 () vector <int > v; v.push_back(1 ); v.push_back(2 ); v.push_back(5 ); v.push_back(2 ); v.push_back(4 ); v.push_back(4 ); v.push_back(3 ); vector <int >::iterator it = adjacent_find(v.begin(), v.end()); if (it == v.end()) { cout << "找不到!" << endl ; } else { cout << "找到相邻重复元素为:" << *it << endl ; } }
总结:面试题中如果出现查找相邻重复元素,记得用STL中的adjacent_find算法
5.2.4 binary_search
查找指定元素是否存在
bool binary_search(iterator beg, iterator end, value);
// 查找指定的元素,查到 返回true 否则false
// 注意: 在无序序列中不可用
// beg 开始迭代器
// end 结束迭代器
// value 查找的元素
1 2 3 4 5 6 7 8 9 10 11 12 13 14 15 16 17 18 19 20 21 22 23 24 25 26 27 28 29 30 31 #include <algorithm> #include <vector> void test01 () vector <int >v; for (int i = 0 ; i < 10 ; i++) { v.push_back(i); } bool ret = binary_search(v.begin(), v.end(),2 ); if (ret) { cout << "找到了" << endl ; } else { cout << "未找到" << endl ; } } int main () test01(); system("pause" ); return 0 ; }
总结:**二分查找法查找效率很高,值得注意的是查找的容器中元素必须的有序序列
5.2.5 count
统计元素个数
count(iterator beg, iterator end, value);
// 统计元素出现次数
// beg 开始迭代器
// end 结束迭代器
// value 统计的元素
1 2 3 4 5 6 7 8 9 10 11 12 13 14 15 16 17 18 19 20 21 22 23 24 25 26 27 28 29 30 31 32 33 34 35 36 37 38 39 40 41 42 43 44 45 46 47 48 49 50 51 52 53 54 55 56 57 58 59 60 61 62 63 64 65 66 67 68 69 70 71 72 73 74 75 #include <algorithm> #include <vector> void test01 () vector <int > v; v.push_back(1 ); v.push_back(2 ); v.push_back(4 ); v.push_back(5 ); v.push_back(3 ); v.push_back(4 ); v.push_back(4 ); int num = count(v.begin(), v.end(), 4 ); cout << "4的个数为: " << num << endl ; } class Person { public : Person(string name, int age) { this ->m_Name = name; this ->m_Age = age; } bool operator ==(const Person & p) { if (this ->m_Age == p.m_Age) { return true ; } else { return false ; } } string m_Name; int m_Age; }; void test02 () vector <Person> v; Person p1 ("刘备" , 35 ) ; Person p2 ("关羽" , 35 ) ; Person p3 ("张飞" , 35 ) ; Person p4 ("赵云" , 30 ) ; Person p5 ("曹操" , 25 ) ; v.push_back(p1); v.push_back(p2); v.push_back(p3); v.push_back(p4); v.push_back(p5); Person p ("诸葛亮" ,35 ) ; int num = count(v.begin(), v.end(), p); cout << "num = " << num << endl ; } int main () test02(); system("pause" ); return 0 ; }
总结: 统计自定义数据类型时候,需要配合重载 operator==
5.2.6 count_if
按条件统计元素个数
count_if(iterator beg, iterator end, _Pred);
// 按条件统计元素出现次数
// beg 开始迭代器
// end 结束迭代器
// _Pred 谓词
1 2 3 4 5 6 7 8 9 10 11 12 13 14 15 16 17 18 19 20 21 22 23 24 25 26 27 28 29 30 31 32 33 34 35 36 37 38 39 40 41 42 43 44 45 46 47 48 49 50 51 52 53 54 55 56 57 58 59 60 61 62 63 64 65 66 67 68 69 70 71 72 73 74 75 76 77 78 79 80 81 82 #include <algorithm> #include <vector> class Greater4 { public : bool operator () (int val) { return val >= 4 ; } }; void test01 () vector <int > v; v.push_back(1 ); v.push_back(2 ); v.push_back(4 ); v.push_back(5 ); v.push_back(3 ); v.push_back(4 ); v.push_back(4 ); int num = count_if(v.begin(), v.end(), Greater4()); cout << "大于4的个数为: " << num << endl ; } class Person { public : Person(string name, int age) { this ->m_Name = name; this ->m_Age = age; } string m_Name; int m_Age; }; class AgeLess35 { public : bool operator () (const Person &p) { return p.m_Age < 35 ; } }; void test02 () vector <Person> v; Person p1 ("刘备" , 35 ) ; Person p2 ("关羽" , 35 ) ; Person p3 ("张飞" , 35 ) ; Person p4 ("赵云" , 30 ) ; Person p5 ("曹操" , 25 ) ; v.push_back(p1); v.push_back(p2); v.push_back(p3); v.push_back(p4); v.push_back(p5); int num = count_if(v.begin(), v.end(), AgeLess35()); cout << "小于35岁的个数:" << num << endl ; } int main () test02(); system("pause" ); return 0 ; }
总结:**按值统计用count,按条件统计用count_if
5.3 常用排序算法
掌握常用的排序算法
sort //对容器内元素进行排序
对容器内元素进行排序
sort(iterator beg, iterator end, _Pred);
// 按值查找元素,找到返回指定位置迭代器,找不到返回结束迭代器位置
// beg 开始迭代器
// end 结束迭代器
// _Pred 谓词
1 2 3 4 5 6 7 8 9 10 11 12 13 14 15 16 17 18 19 20 21 22 23 24 25 26 27 28 29 30 31 32 33 34 35 #include <algorithm> #include <vector> void myPrint (int val) cout << val << " " ; } void test01 () vector <int > v; v.push_back(10 ); v.push_back(30 ); v.push_back(50 ); v.push_back(20 ); v.push_back(40 ); sort(v.begin(), v.end()); for_each(v.begin(), v.end(), myPrint); cout << endl ; sort(v.begin(), v.end(), greater<int >()); for_each(v.begin(), v.end(), myPrint); cout << endl ; } int main () test01(); system("pause" ); return 0 ; }
总结:sort属于开发中最常用的算法之一,需熟练掌握
5.3.2 random_shuffle
洗牌 指定范围内的元素随机调整次序
random_shuffle(iterator beg, iterator end);
// 指定范围内的元素随机调整次序
// beg 开始迭代器
// end 结束迭代器
1 2 3 4 5 6 7 8 9 10 11 12 13 14 15 16 17 18 19 20 21 22 23 24 25 26 27 28 29 30 31 32 33 34 35 36 37 38 #include <algorithm> #include <vector> #include <ctime> class myPrint { public : void operator () (int val) { cout << val << " " ; } }; void test01 () srand((unsigned int )time(NULL )); vector <int > v; for (int i = 0 ; i < 10 ;i++) { v.push_back(i); } for_each(v.begin(), v.end(), myPrint()); cout << endl ; random_shuffle(v.begin(), v.end()); for_each(v.begin(), v.end(), myPrint()); cout << endl ; } int main () test01(); system("pause" ); return 0 ; }
总结:**random_shuffle洗牌算法比较实用,使用时记得加随机数种子
5.3.3 merge
两个容器元素合并,并存储到另一容器中
merge(iterator beg1, iterator end1, iterator beg2, iterator end2, iterator dest);
// 容器元素合并,并存储到另一容器中
// 注意: 两个容器必须是有序的
// beg1 容器1开始迭代器 // end1 容器1结束迭代器 // beg2 容器2开始迭代器 // end2 容器2结束迭代器 // dest 目标容器开始迭代器
1 2 3 4 5 6 7 8 9 10 11 12 13 14 15 16 17 18 19 20 21 22 23 24 25 26 27 28 29 30 31 32 33 34 35 36 37 38 39 #include <algorithm> #include <vector> class myPrint { public : void operator () (int val) { cout << val << " " ; } }; void test01 () vector <int > v1; vector <int > v2; for (int i = 0 ; i < 10 ; i++) { v1.push_back(i); v2.push_back(i + 1 ); } vector <int > vtarget; vtarget.resize(v1.size() + v2.size()); merge(v1.begin(), v1.end(), v2.begin(), v2.end(), vtarget.begin()); for_each(vtarget.begin(), vtarget.end(), myPrint()); cout << endl ; } int main () test01(); system("pause" ); return 0 ; }
总结:**merge合并的两个容器必须的有序序列
5.3.4 reverse
将容器内元素进行反转
reverse(iterator beg, iterator end);
// 反转指定范围的元素
// beg 开始迭代器
// end 结束迭代器
1 2 3 4 5 6 7 8 9 10 11 12 13 14 15 16 17 18 19 20 21 22 23 24 25 26 27 28 29 30 31 32 33 34 35 36 37 38 39 40 #include <algorithm> #include <vector> class myPrint { public : void operator () (int val) { cout << val << " " ; } }; void test01 () vector <int > v; v.push_back(10 ); v.push_back(30 ); v.push_back(50 ); v.push_back(20 ); v.push_back(40 ); cout << "反转前: " << endl ; for_each(v.begin(), v.end(), myPrint()); cout << endl ; cout << "反转后: " << endl ; reverse(v.begin(), v.end()); for_each(v.begin(), v.end(), myPrint()); cout << endl ; } int main () test01(); system("pause" ); return 0 ; }
总结:**reverse反转区间内元素,面试题可能涉及到
5.4 常用拷贝和替换算法
掌握常用的拷贝和替换算法
copy // 容器内指定范围的元素拷贝到另一容器中
容器内指定范围的元素拷贝到另一容器中
copy(iterator beg, iterator end, iterator dest);
// 按值查找元素,找到返回指定位置迭代器,找不到返回结束迭代器位置
// beg 开始迭代器
// end 结束迭代器
// dest 目标起始迭代器
1 2 3 4 5 6 7 8 9 10 11 12 13 14 15 16 17 18 19 20 21 22 23 24 25 26 27 28 29 30 31 32 33 34 #include <algorithm> #include <vector> class myPrint { public : void operator () (int val) { cout << val << " " ; } }; void test01 () vector <int > v1; for (int i = 0 ; i < 10 ; i++) { v1.push_back(i + 1 ); } vector <int > v2; v2.resize(v1.size()); copy(v1.begin(), v1.end(), v2.begin()); for_each(v2.begin(), v2.end(), myPrint()); cout << endl ; } int main () test01(); system("pause" ); return 0 ; }
总结:**利用copy算法在拷贝时,目标容器记得提前开辟空间
5.4.2 replace
将容器内指定范围的旧元素修改为新元素
replace(iterator beg, iterator end, oldvalue, newvalue);
// 将区间内旧元素 替换成 新元素
// beg 开始迭代器
// end 结束迭代器
// oldvalue 旧元素
// newvalue 新元素
1 2 3 4 5 6 7 8 9 10 11 12 13 14 15 16 17 18 19 20 21 22 23 24 25 26 27 28 29 30 31 32 33 34 35 36 37 38 39 40 41 42 #include <algorithm> #include <vector> class myPrint { public : void operator () (int val) { cout << val << " " ; } }; void test01 () vector <int > v; v.push_back(20 ); v.push_back(30 ); v.push_back(20 ); v.push_back(40 ); v.push_back(50 ); v.push_back(10 ); v.push_back(20 ); cout << "替换前:" << endl ; for_each(v.begin(), v.end(), myPrint()); cout << endl ; cout << "替换后:" << endl ; replace(v.begin(), v.end(), 20 ,2000 ); for_each(v.begin(), v.end(), myPrint()); cout << endl ; } int main () test01(); system("pause" ); return 0 ; }
总结:**replace会替换区间内满足条件的元素
5.4.3 replace_if
将区间内满足条件的元素,替换成指定元素
replace_if(iterator beg, iterator end, _pred, newvalue);
// 按条件替换元素,满足条件的替换成指定元素
// beg 开始迭代器
// end 结束迭代器
// _pred 谓词
// newvalue 替换的新元素
1 2 3 4 5 6 7 8 9 10 11 12 13 14 15 16 17 18 19 20 21 22 23 24 25 26 27 28 29 30 31 32 33 34 35 36 37 38 39 40 41 42 43 44 45 46 47 48 49 50 51 52 #include <algorithm> #include <vector> class myPrint { public : void operator () (int val) { cout << val << " " ; } }; class ReplaceGreater30 { public : bool operator () (int val) { return val >= 30 ; } }; void test01 () vector <int > v; v.push_back(20 ); v.push_back(30 ); v.push_back(20 ); v.push_back(40 ); v.push_back(50 ); v.push_back(10 ); v.push_back(20 ); cout << "替换前:" << endl ; for_each(v.begin(), v.end(), myPrint()); cout << endl ; cout << "替换后:" << endl ; replace_if(v.begin(), v.end(), ReplaceGreater30(), 3000 ); for_each(v.begin(), v.end(), myPrint()); cout << endl ; } int main () test01(); system("pause" ); return 0 ; }
总结:**replace_if按条件查找,可以利用仿函数灵活筛选满足的条件
5.4.4 swap
互换两个容器的元素
swap(container c1, container c2);
// 互换两个容器的元素
// c1容器1
// c2容器2
1 2 3 4 5 6 7 8 9 10 11 12 13 14 15 16 17 18 19 20 21 22 23 24 25 26 27 28 29 30 31 32 33 34 35 36 37 38 39 40 41 42 43 #include <algorithm> #include <vector> class myPrint { public : void operator () (int val) { cout << val << " " ; } }; void test01 () vector <int > v1; vector <int > v2; for (int i = 0 ; i < 10 ; i++) { v1.push_back(i); v2.push_back(i+100 ); } cout << "交换前: " << endl ; for_each(v1.begin(), v1.end(), myPrint()); cout << endl ; for_each(v2.begin(), v2.end(), myPrint()); cout << endl ; cout << "交换后: " << endl ; swap(v1, v2); for_each(v1.begin(), v1.end(), myPrint()); cout << endl ; for_each(v2.begin(), v2.end(), myPrint()); cout << endl ; } int main () test01(); system("pause" ); return 0 ; }
总结:**swap交换容器时,注意交换的容器要同种类型
5.5 常用算术生成算法
掌握常用的算术生成算法
算术生成算法属于小型算法,使用时包含的头文件为 #include
accumulate // 计算容器元素累计总和
fill // 向容器中添加元素
5.5.1 accumulate
计算区间内 容器元素累计总和
accumulate(iterator beg, iterator end, value);
// 计算容器元素累计总和
// beg 开始迭代器
// end 结束迭代器
// value 起始值
1 2 3 4 5 6 7 8 9 10 11 12 13 14 15 16 17 18 19 20 21 22 #include <numeric> #include <vector> void test01 () vector <int > v; for (int i = 0 ; i <= 100 ; i++) { v.push_back(i); } int total = accumulate(v.begin(), v.end(), 0 ); cout << "total = " << total << endl ; } int main () test01(); system("pause" ); return 0 ; }
总结:**accumulate使用时头文件注意是 numeric,这个算法很实用
5.5.2 fill
向容器中填充指定的元素
fill(iterator beg, iterator end, value);
// 向容器中填充元素
// beg 开始迭代器
// end 结束迭代器
// value 填充的值
1 2 3 4 5 6 7 8 9 10 11 12 13 14 15 16 17 18 19 20 21 22 23 24 25 26 27 28 29 30 31 32 33 #include <numeric> #include <vector> #include <algorithm> class myPrint { public : void operator () (int val) { cout << val << " " ; } }; void test01 () vector <int > v; v.resize(10 ); fill(v.begin(), v.end(), 100 ); for_each(v.begin(), v.end(), myPrint()); cout << endl ; } int main () test01(); system("pause" ); return 0 ; }
总结:**利用fill可以将容器区间内元素填充为 指定的值
5.6 常用集合算法
掌握常用的集合算法
set_intersection // 求两个容器的交集
set_union // 求两个容器的并集
set_difference // 求两个容器的差集
5.6.1 set_intersection
求两个容器的交集
set_intersection(iterator beg1, iterator end1, iterator beg2, iterator end2, iterator dest);
// 求两个集合的交集
// 注意:两个集合必须是有序序列
// beg1 容器1开始迭代器 // end1 容器1结束迭代器 // beg2 容器2开始迭代器 // end2 容器2结束迭代器 // dest 目标容器开始迭代器
1 2 3 4 5 6 7 8 9 10 11 12 13 14 15 16 17 18 19 20 21 22 23 24 25 26 27 28 29 30 31 32 33 34 35 36 37 38 39 40 41 42 #include <vector> #include <algorithm> class myPrint { public : void operator () (int val) { cout << val << " " ; } }; void test01 () vector <int > v1; vector <int > v2; for (int i = 0 ; i < 10 ; i++) { v1.push_back(i); v2.push_back(i+5 ); } vector <int > vTarget; vTarget.resize(min(v1.size(), v2.size())); vector <int >::iterator itEnd = set_intersection(v1.begin(), v1.end(), v2.begin(), v2.end(), vTarget.begin()); for_each(vTarget.begin(), itEnd, myPrint()); cout << endl ; } int main () test01(); system("pause" ); return 0 ; }
总结:
求交集的两个集合必须的有序序列
求两个集合的并集
set_union(iterator beg1, iterator end1, iterator beg2, iterator end2, iterator dest);
// 求两个集合的并集
// 注意:两个集合必须是有序序列
// beg1 容器1开始迭代器 // end1 容器1结束迭代器 // beg2 容器2开始迭代器 // end2 容器2结束迭代器 // dest 目标容器开始迭代器
1 2 3 4 5 6 7 8 9 10 11 12 13 14 15 16 17 18 19 20 21 22 23 24 25 26 27 28 29 30 31 32 33 34 35 36 37 38 39 40 41 #include <vector> #include <algorithm> class myPrint { public : void operator () (int val) { cout << val << " " ; } }; void test01 () vector <int > v1; vector <int > v2; for (int i = 0 ; i < 10 ; i++) { v1.push_back(i); v2.push_back(i+5 ); } vector <int > vTarget; vTarget.resize(v1.size() + v2.size()); vector <int >::iterator itEnd = set_union(v1.begin(), v1.end(), v2.begin(), v2.end(), vTarget.begin()); for_each(vTarget.begin(), itEnd, myPrint()); cout << endl ; } int main () test01(); system("pause" ); return 0 ; }
总结:
求并集的两个集合必须的有序序列
求两个集合的差集
set_difference(iterator beg1, iterator end1, iterator beg2, iterator end2, iterator dest);
// 求两个集合的差集
// 注意:两个集合必须是有序序列
// beg1 容器1开始迭代器 // end1 容器1结束迭代器 // beg2 容器2开始迭代器 // end2 容器2结束迭代器 // dest 目标容器开始迭代器
1 2 3 4 5 6 7 8 9 10 11 12 13 14 15 16 17 18 19 20 21 22 23 24 25 26 27 28 29 30 31 32 33 34 35 36 37 38 39 40 41 42 43 44 45 46 47 #include <vector> #include <algorithm> class myPrint { public : void operator () (int val) { cout << val << " " ; } }; void test01 () vector <int > v1; vector <int > v2; for (int i = 0 ; i < 10 ; i++) { v1.push_back(i); v2.push_back(i+5 ); } vector <int > vTarget; vTarget.resize( max(v1.size() , v2.size())); cout << "v1与v2的差集为: " << endl ; vector <int >::iterator itEnd = set_difference(v1.begin(), v1.end(), v2.begin(), v2.end(), vTarget.begin()); for_each(vTarget.begin(), itEnd, myPrint()); cout << endl ; cout << "v2与v1的差集为: " << endl ; itEnd = set_difference(v2.begin(), v2.end(), v1.begin(), v1.end(), vTarget.begin()); for_each(vTarget.begin(), itEnd, myPrint()); cout << endl ; } int main () test01(); system("pause" ); return 0 ; }
总结:
求差集的两个集合必须的有序序列
匈牙利命名法
宏、枚举、常量,用大写字母命名,复合词用下划线隔开。
类、类型定义和枚举型名的第一个字母大写。
函数名是复合词的,第一个词采用全部小写,随后每个单词第一个字母大写。
循环变量可采用 i, j, k 等。
类的成员变量词头为 m_。
全局变量词头为 g_ 。
临时变量词头为 tmp_ 。
对结构体内的变量命名,遵循变量的具体含义命名原则。
用小写字母的前缀表示变量的类型,前缀的下一个字母用大写。
有些词头可以和其它词头组合。
1 2 3 4 5 6 7 8 9 10 #define ARRAY_SIZE 24 int g_iFlag; classMyClass { }; void someFunc ( ) int nArray[ARRAY_SIZE];unsigned char uchByte;char szName[ ];char *pszName = szName;}
词头类型
ch
char
l
long
i
integer
u
unsigned
b
boolean
p
pointer
d
double
s
string
st
structure
sz
ASCII string
by
byte
n
short int
H
handle
x,y
坐标
dw
DWORD
fn
function
词头变量名
sig
signal
msg
message
sb
binary semaphores
wd
watchdog
sm
mutual exclusion semaphores
tm
timer
sc
counting semaphores
程序注释 分为文件、函数、功能注释。
1 2 3 4 5 6 7 8 9 10 11 注释开头应和上一函数空两行 格式: int assignmentComplete (int iCellId, char *pszMSGData) throw (exception1, exception2) 输入: int iCellId: MS 所在的小区识别iCellId 取值:0x00 -——0xff 输出: char *pszMSGData:指配完成消息数据返回值: 0x00 正常 异常:exception1 异常情况1 , exception2 异常情况2 注释后直接开始程序正文,不空行。
其他 建议不要使用 *=,^=, /= 等运算符。
简单变量引用 简单变量引用可以为同一变量取不同的名字
int Rat;int & Mouse=Rat;Mouse=Mickey; //Rat=Mickey*(& Rat),这种理解可能是正确的。
C专家编程
访问控制 public 在类的外部可见,一般原则是不要把类的数据做成 public,只有类本身才能改变自己的数据,外部函数只能调用类的成员函数,保证了类的数据只会以合乎规则的方式被更新
类中的每个函数声明都需要一个实现,通常在类外部实现 ,则前面必须附加前缀 ::(全局范围分解符),好处是可以通过使用头文件,使源代码的组织形式更为清晰。类内部实现会使编译后的代码变长,通常用于非常简短的函数,它的代码在编译时在声明处自动展开,在运行时就不必付出函数调用的代价。
构造函数的名字总是和类的名字一样
当类的一个对象被创建时,构造函数会被自动调用,不应该显式调用构造函数。至于全局和静态对象,它们的构造函数会在程序开始时被自动调用,而当程序终止时,它们的析构函数会被自动调用。
继承 继承在两个类之间(而不是两个函数之间)进行
重载 复用一个现存的(函数或操作符)名字,操作一个不同的类型。总是在编译时进行解析
重载后的操作符的优先级和操作数(编译器行话中的”arity”)与原先操作符相同
多态 多态是指一个函数或操作符只有一个名字
C 与 C++ C++ 对 C 的改进
像 char b[3]=“Bob" 这样的表达式在 C 中合法,C++ 中被认为是一个错误。
类型转换既可写成更顺眼的 float(i) 形式,也可写成 (float)i 这样的 C 风格
C++ 允许一个常量整数来定义数组的大小,但在 C 中错误。const int size = 128;char a[size];
声明可以穿插于语句之间。在 C 中,一个语句块中所有的声明都必须放在所有语句的前面。C++ 去掉了这个限制。
C++ 中存在,但在 C 中却不存在的限制
C++ 中,用户代码不能调用 main() 函数,但在 C 中却允许(这种情况极为罕见)
完整的函数原型声明在 C++ 中是必须的,但在 C 中没这么严格
C++ 中,由 typedef 定义的名字不能与已有的结构标签冲突,但在 C 中却允许(它们分属不同的名字空间)
当 void* 指针赋值给另一个类型的指针时,C++ 规定必须进行强制类型转换,但在 C 中却无必要
在 C++ 和 C 中含义不一样的特性
C++ 至少增加了十几个关键字。这些关键字在 C 中可以作为标识符使用,但如果这样做了,用 C++ 编译器时会报错。
C++ 中声明可以出现在语句可以出现的任何地方。在 C 的代码块中,所有的声明必须出现在所有语句的前面。
C++ 中一个内层范围的结构名将会隐藏外层空间中相同的对象名。在 C 中则非如此。
C++ 中字符常量的类型是 char,但在 C 中,它们的类型是 int。即在 C++ 中,sizeof('a') 的结果是 1,而在 C 中值要大一些。
C++ 增加了 // 注释符,有时会在两种语言中产生微妙而怪异的差别
尽量使用的C++特性:
避免使用的C++特性:
0x0 References
C++ 匠心之作
0x0 Postscript